It is behind a major evolution, if not a revolution. It works with blocks. It can be used without coding. And you most likely use it to write your posts and pages.
Got it? It’s the WordPress Gutenberg editor. With it, you can do everything, or almost everything. Provided you know how to use it. Which isn’t so simple, as this editor is packed with hidden features and constantly offers new options.
By the end of this practical guide, you’ll know everything about how Gutenberg works. And you’ll know how to use it inside out, thanks to our detailed tutorials and practical tips.
What is Gutenberg WordPress?
Gutenberg is the WordPress text editor. It is based on the principle of “blocks,” content elements that users use to write, but also to customize the design of the posts and pages on their WordPress site. It replaces WordPress’s former classic text editor, called TinyMCE.
With Gutenberg, “the overall goal is to simplify the first-time WordPress experience—for those who write, edit, publish, and design web pages, explains the FAQ dedicated to the text editor. The editing experience is intended to give users a better visual representation of what their post or page will look like when they press the Publish button. ”
Thanks to this, as you will see in detail in this article, all your changes to the appearance and text of your content types are visible in real time, as soon as a modification is made.
In this respect, Gutenberg on WordPress can be likened to what is known as a WYSIWYG editor (What You See Is What You Get).
Did you know? The name of WordPress’s Gutenberg editor is a reference to Johannes Gutenberg, the inventor of the printing press in the 15th century. This invention, revolutionary at the time, also has an echo and a parallel on WordPress. Indeed, the arrival of Gutenberg is considered “one of the biggest changes to WordPress in several years.”
What is the Gutenberg plugin?
This major change, precisely, began to take shape in 2017, before an official launch in December 2018, with the release of WordPress version 5.0.
Since then, the Gutenberg editor has been present by default in versions 5.0 and later of the CMS (Content Management System), the most widely used in the world.
In principle, you should therefore be using—even without knowing it—Gutenberg on your website. Indeed, at the time of writing, the latest up-to-date major version of WordPress was 6.1.
However, there is also a Gutenberg plugin, available in the official WordPress plugin directory (repository).
This plugin contains the new developments, options and experiments from Gutenberg. Once they are approved, they then appear in each new major version of WordPress.
You can find a list of all Gutenberg versions included in each new major version of WordPress on this page.
You may be asking yourself the following question: Do I need to install the Gutenberg editor on WordPress? To make this perfectly clear: if your website is running a version later than WordPress 5.0, you do NOT need to activate the Gutenberg plugin in your administration interface (back office).
Gutenberg is already present by default on your site. If you still want to discover the latest Gutenberg experiments and new features ahead of time, you can install and activate the plugin, but above all not on your production site. Use a staging site or a local site instead to test this plugin.
What are the different phases in the evolution of Gutenberg on WordPress?
Although it has been running on WordPress since the end of 2018, the WordPress Gutenberg “project” is under permanent development and constantly evolving, as indicated on its roadmap (Gutenberg roadmap).
Four phases mark its existence:
- Phase 1: Make editing easier for users.
- Phase 2 : Customization. Gutenberg notably makes it possible to completely modify all parts of your site, from the header to the footer (and no longer just posts and pages). This is the phase we are in at the time of publishing these lines (November 2022).
- Phase 3: Collaboration. Gutenberg will make it possible to co-write content “in a more intuitive way”.
- Phase 4: Multilingualism. The text editor will be implemented by default for multilingual sites.
How does Gutenberg work on WordPress?
Blocks, the fundamental foundation
As you saw a little earlier, Gutenberg goes hand in hand with a central concept: the famous “blocks.”
The Gutenberg presentation page explains that “blocks are content elements that you can move around.” They “allow you to build your own custom posts and pages without any coding knowledge.”
Every content element within the editor is a block (a kind of container-type section). This could be, for example:
- a paragraph;
- a heading;
- an image;
- a video;
- a button, etc.
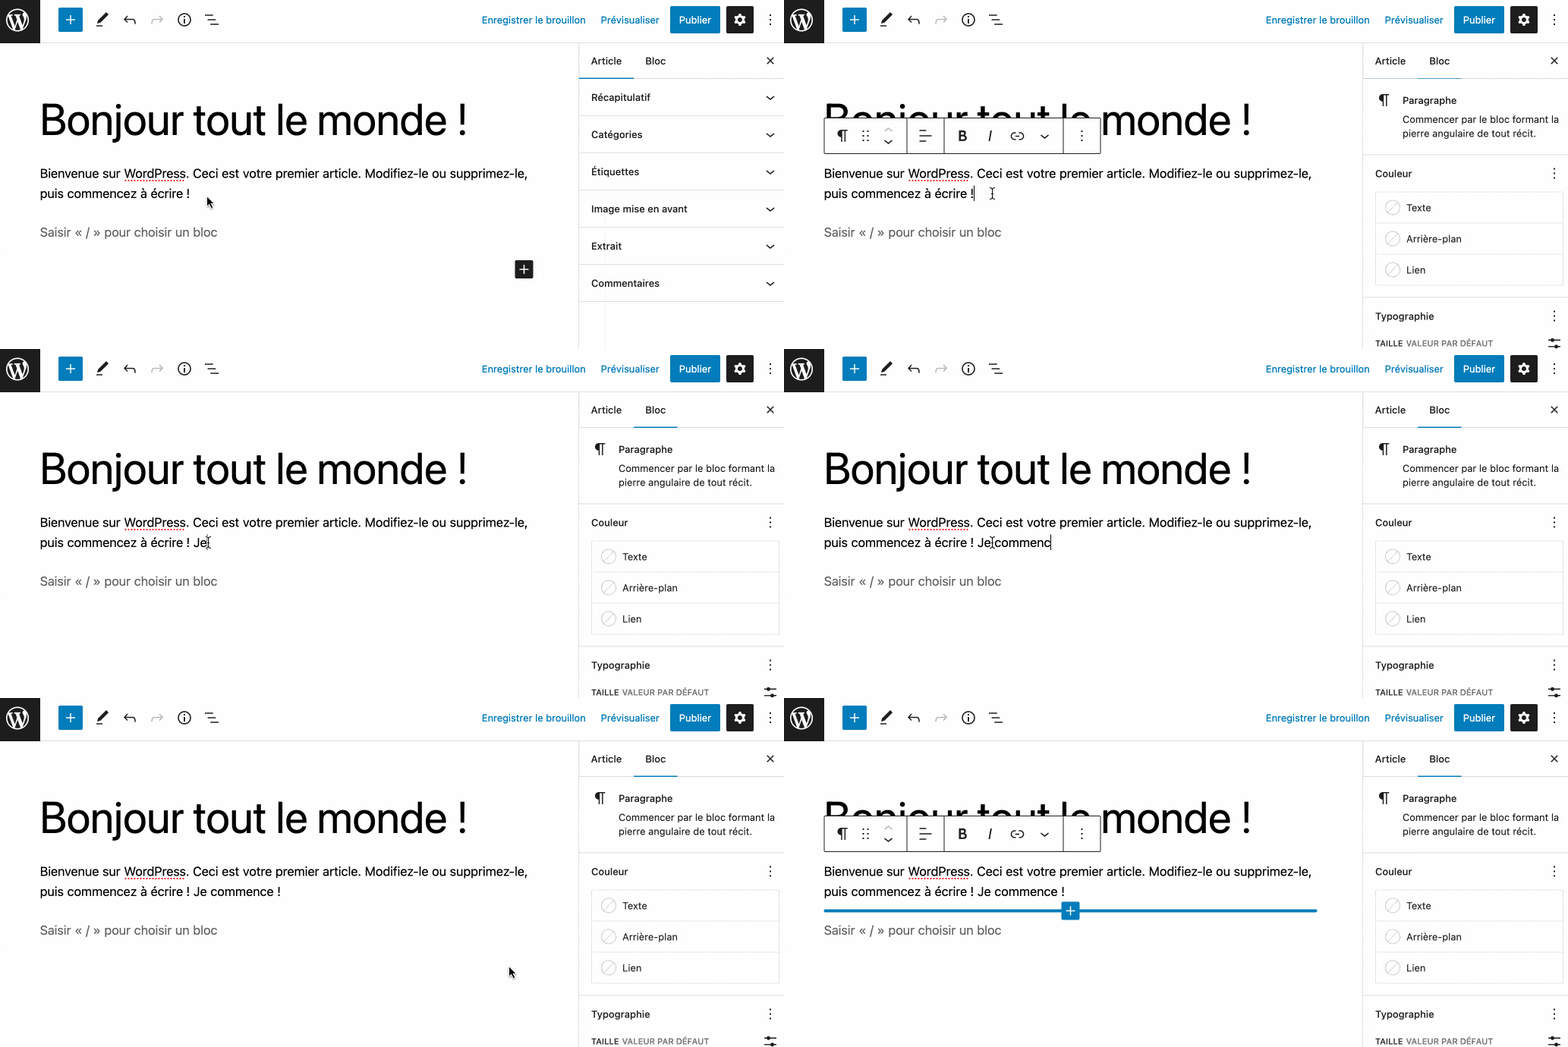
Each block can be edited and customized by users without touching a single line of code (HTML, PHP, etc.). All of this is done visually, with an immediate rendering of your changes:
Posts, pages, and even an entire site!
When it launched in 2018, Gutenberg only worked on posts and pages.
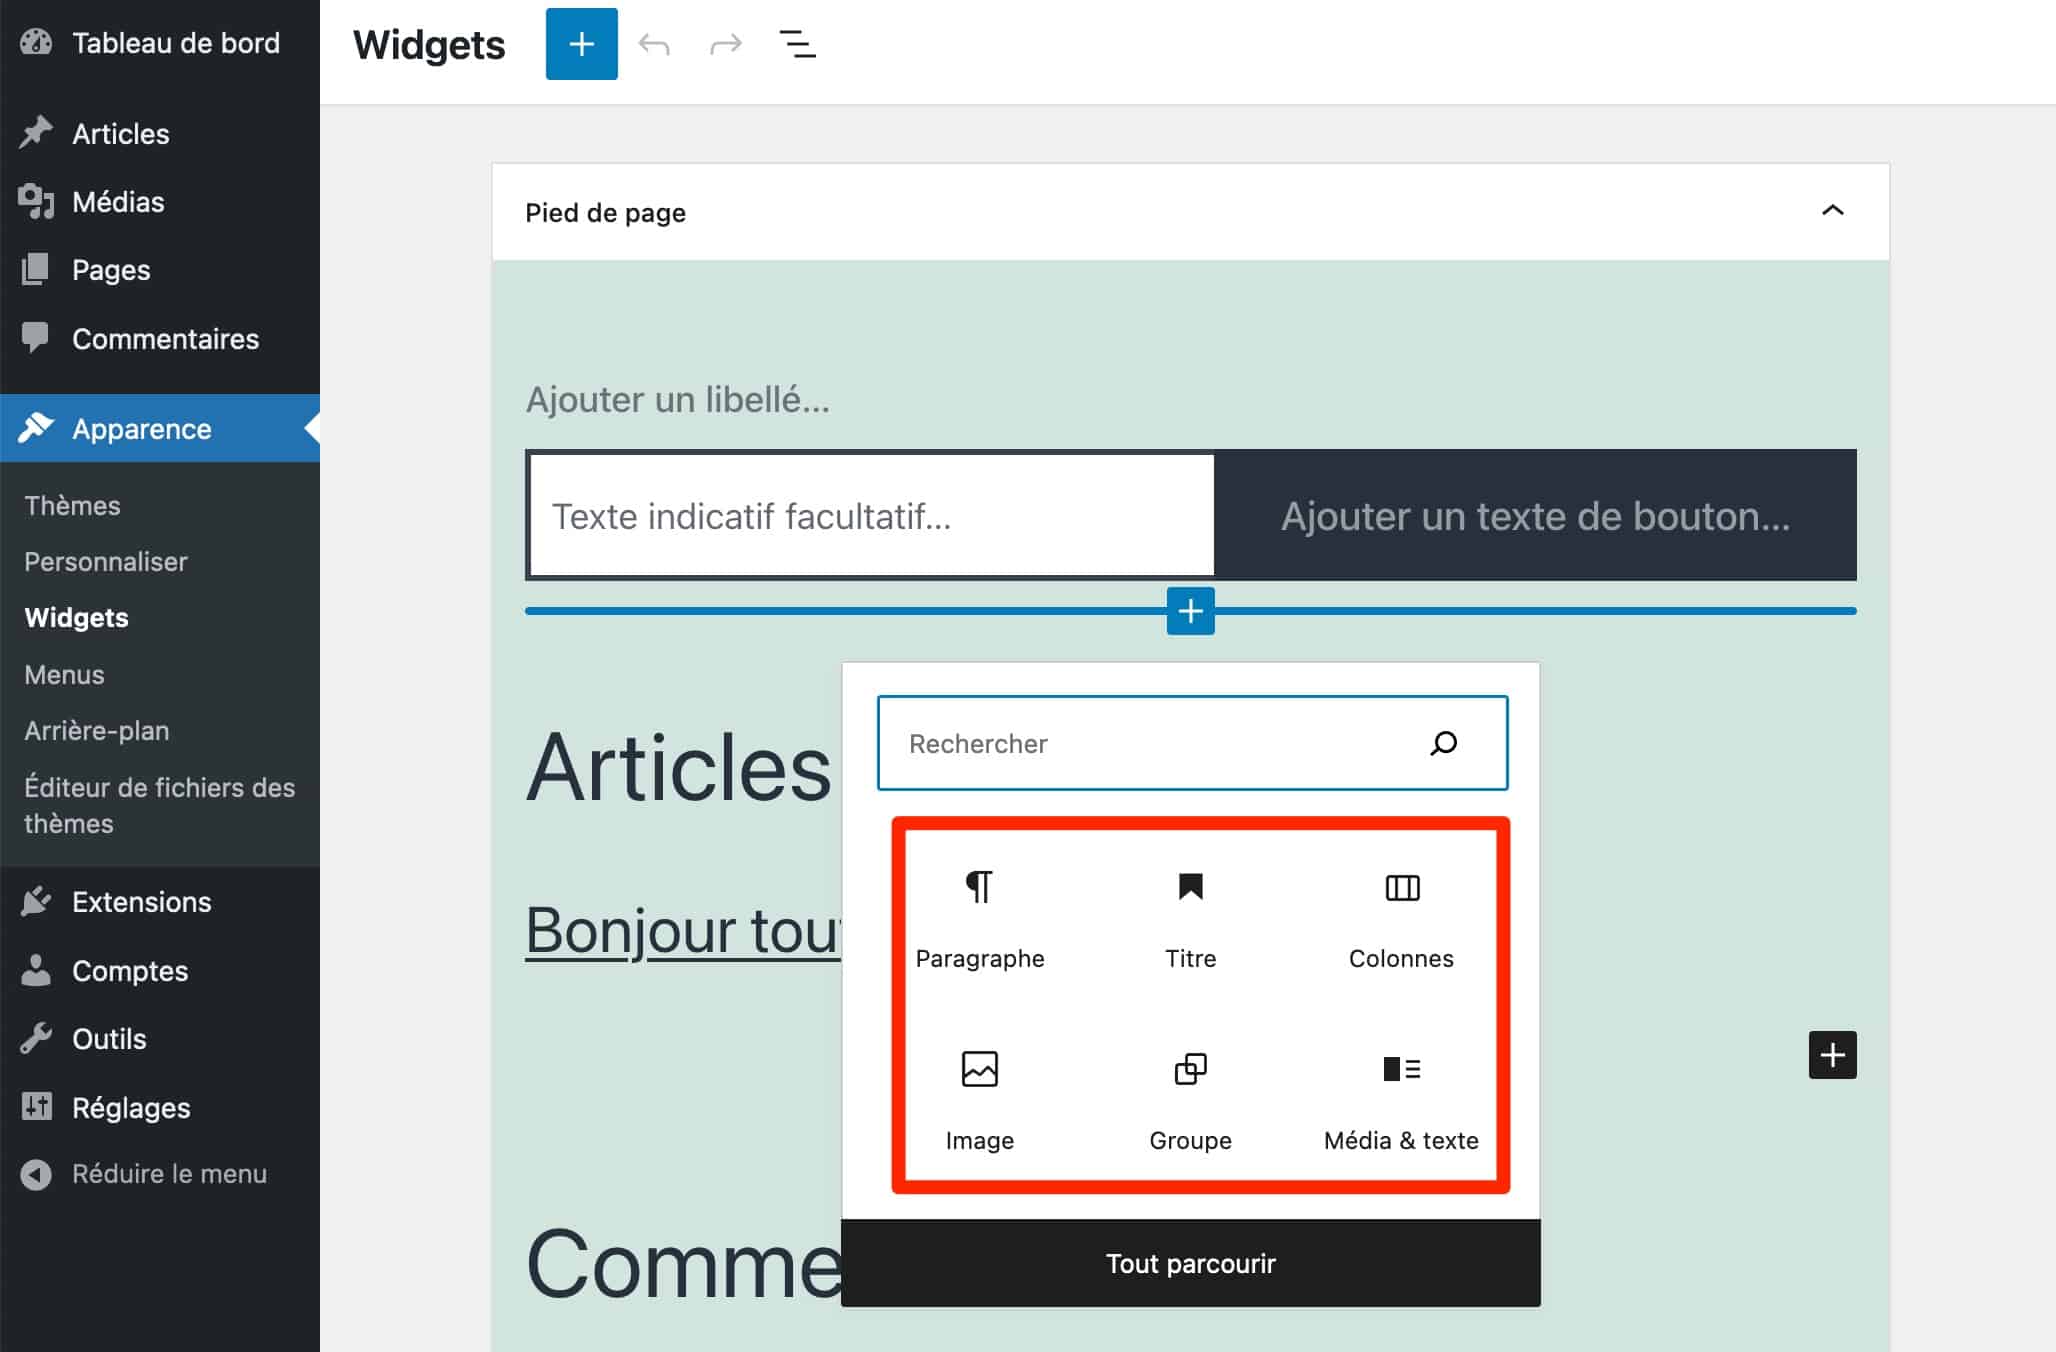
Since then, the editor has come a very long way. Since the release of WordPress 5.8, in July 2021, the WordPress widget editor has, for example, worked with content elements (blocks).
If you go to Appearance > Widgets in your admin interface menu, you will see that it is possible to insert blocks (sections) into the widget areas provided by your theme (e.g.: sidebar, footer, etc.):
But wait, you haven’t seen everything yet. Since the release of WordPress 5.9 in early 2022, the Gutenberg editor on WordPress now makes it possible to create and customize entire sites with blocks!
This is what is known as the Site Editor (formerly called Full Site Editing, FSE, in English). With this project, blocks are now used to edit every part of your site, not just your posts and pages.
With the Site Editor, users can now manage elements normally controlled by their WordPress theme (header, footer, 404 page, post archives, etc.) using a single concept: the Gutenberg block.
To take advantage of it, there are at least two prerequisites:
- Your site must be running at least WordPress version 5.9. If it is, you will be able to access full site editing by going to Appearance > Editor;
- You must use a block-based theme (block based theme, in English). This is the case, for example, with Twenty Twenty Three, the theme included by default with WordPress 6.1. For your information, you will find a list of block-based themes in the official WordPress directory.
If you’re new to WordPress and/or have limited technical knowledge of web development and web design, we don’t recommend using Full Site Editing for now. There are still few compatible themes, and you need solid overall knowledge to be able to create a professional website that holds up using only Gutenberg blocks on WordPress.
What is the difference between Gutenberg and a page builder like Divi or Elementor?
Gutenberg lets you edit an entire site? That may remind you of something. Namely: page builders (page builders).
Like the WordPress text editor, page builders such as Elementor or the Divi Builder, two of the most famous among them, allow you to design a site from scratch. And they give you control over every part and option of your site.
That said, the Gutenberg editor has not yet reached their level of options and creative possibilities. For example, the Divi Builder or Elementor offers ready-to-use site and page templates (templates) that you simply need to activate with one click.
Gutenberg is slowly getting closer with its block patterns (block patterns), but it is far from measuring up at that level.
Furthermore, at present, it seems easier to us to fully edit a site using a page builder, especially if you are a beginner.
The Site Editor still needs more time so that Gutenberg can compete with page builders (even if the creation experience is completely different).
In short, if you have to choose between Gutenberg or the Elementor plugin—yes, it is technically a plugin—to create a WordPress site, first ask yourself about your technical level.
If you have a good grounding in WordPress, as well as in web design, starting with a Full Site Editing-compatible theme remains an option.
Otherwise, rely on Gutenberg to write and edit your posts, or even some pages that do not require too much graphic design work (e.g., the Contact page). And use a page builder for more advanced layouts.
After this detailed general overview, which laid the groundwork, let’s move on to practice.
You will now learn how to use Gutenberg on WordPress, and you’ll become fully self-sufficient very quickly.
How to use Gutenberg: step-by-step guide
How is the Gutenberg interface organized on WordPress?
To start using Gutenberg, go either through Posts > Add New or Pages > Add New.
Decide based on the type of content you want to create. For the purposes of this test, I’m choosing a post.
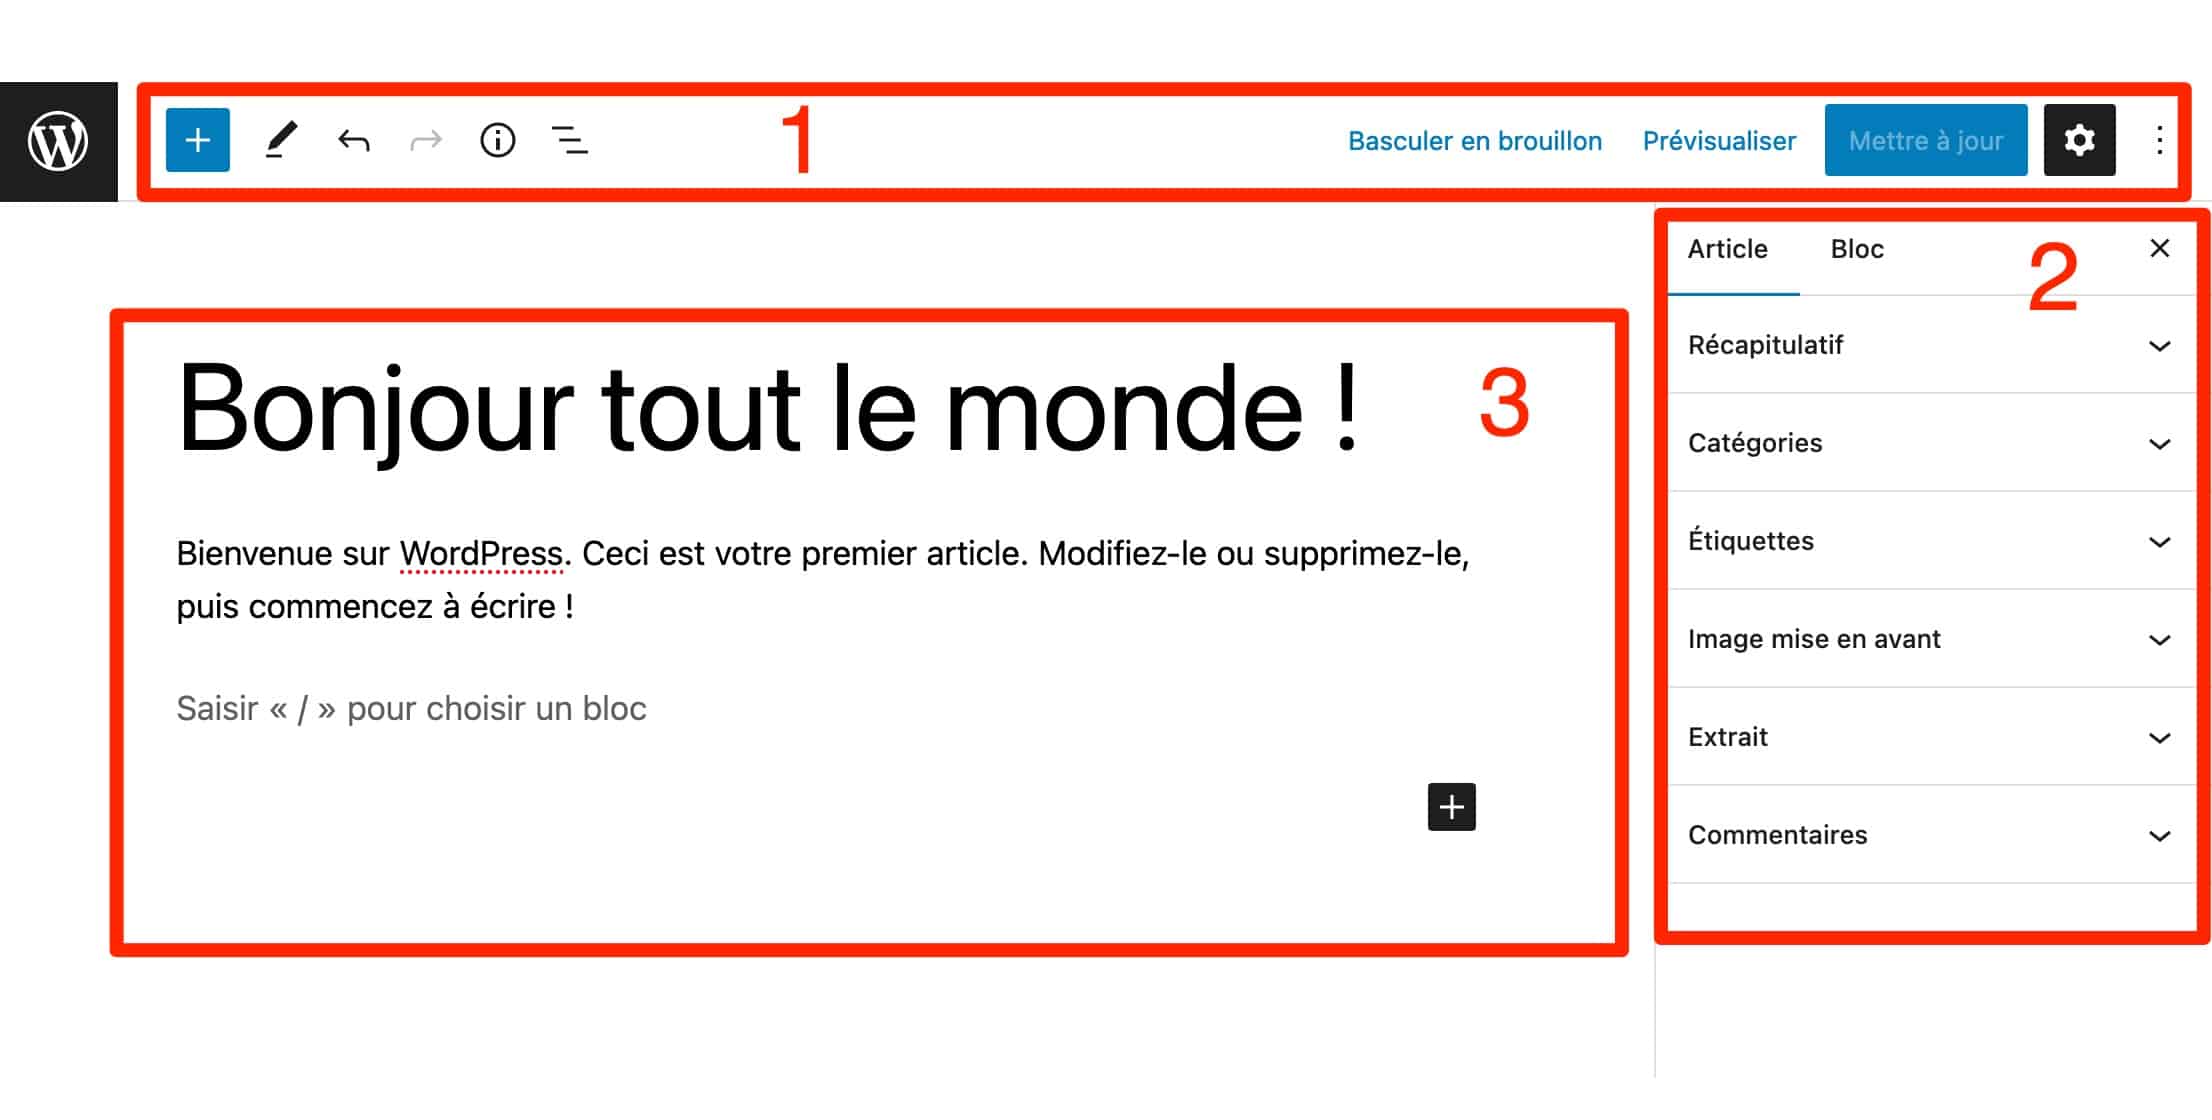
By default, the editing interface is divided into 3 sections for users:
- A top bar (number 1 in the screenshot), with quick-access buttons, such as the one for inserting a block (section), for example.
- A sidebar (sidebar, number 2), which contains settings for the post and the blocks you are going to add.
- A content area (number 3), in the center of the page. It contains all the blocks you will add as you go.
How do you add Gutenberg blocks?
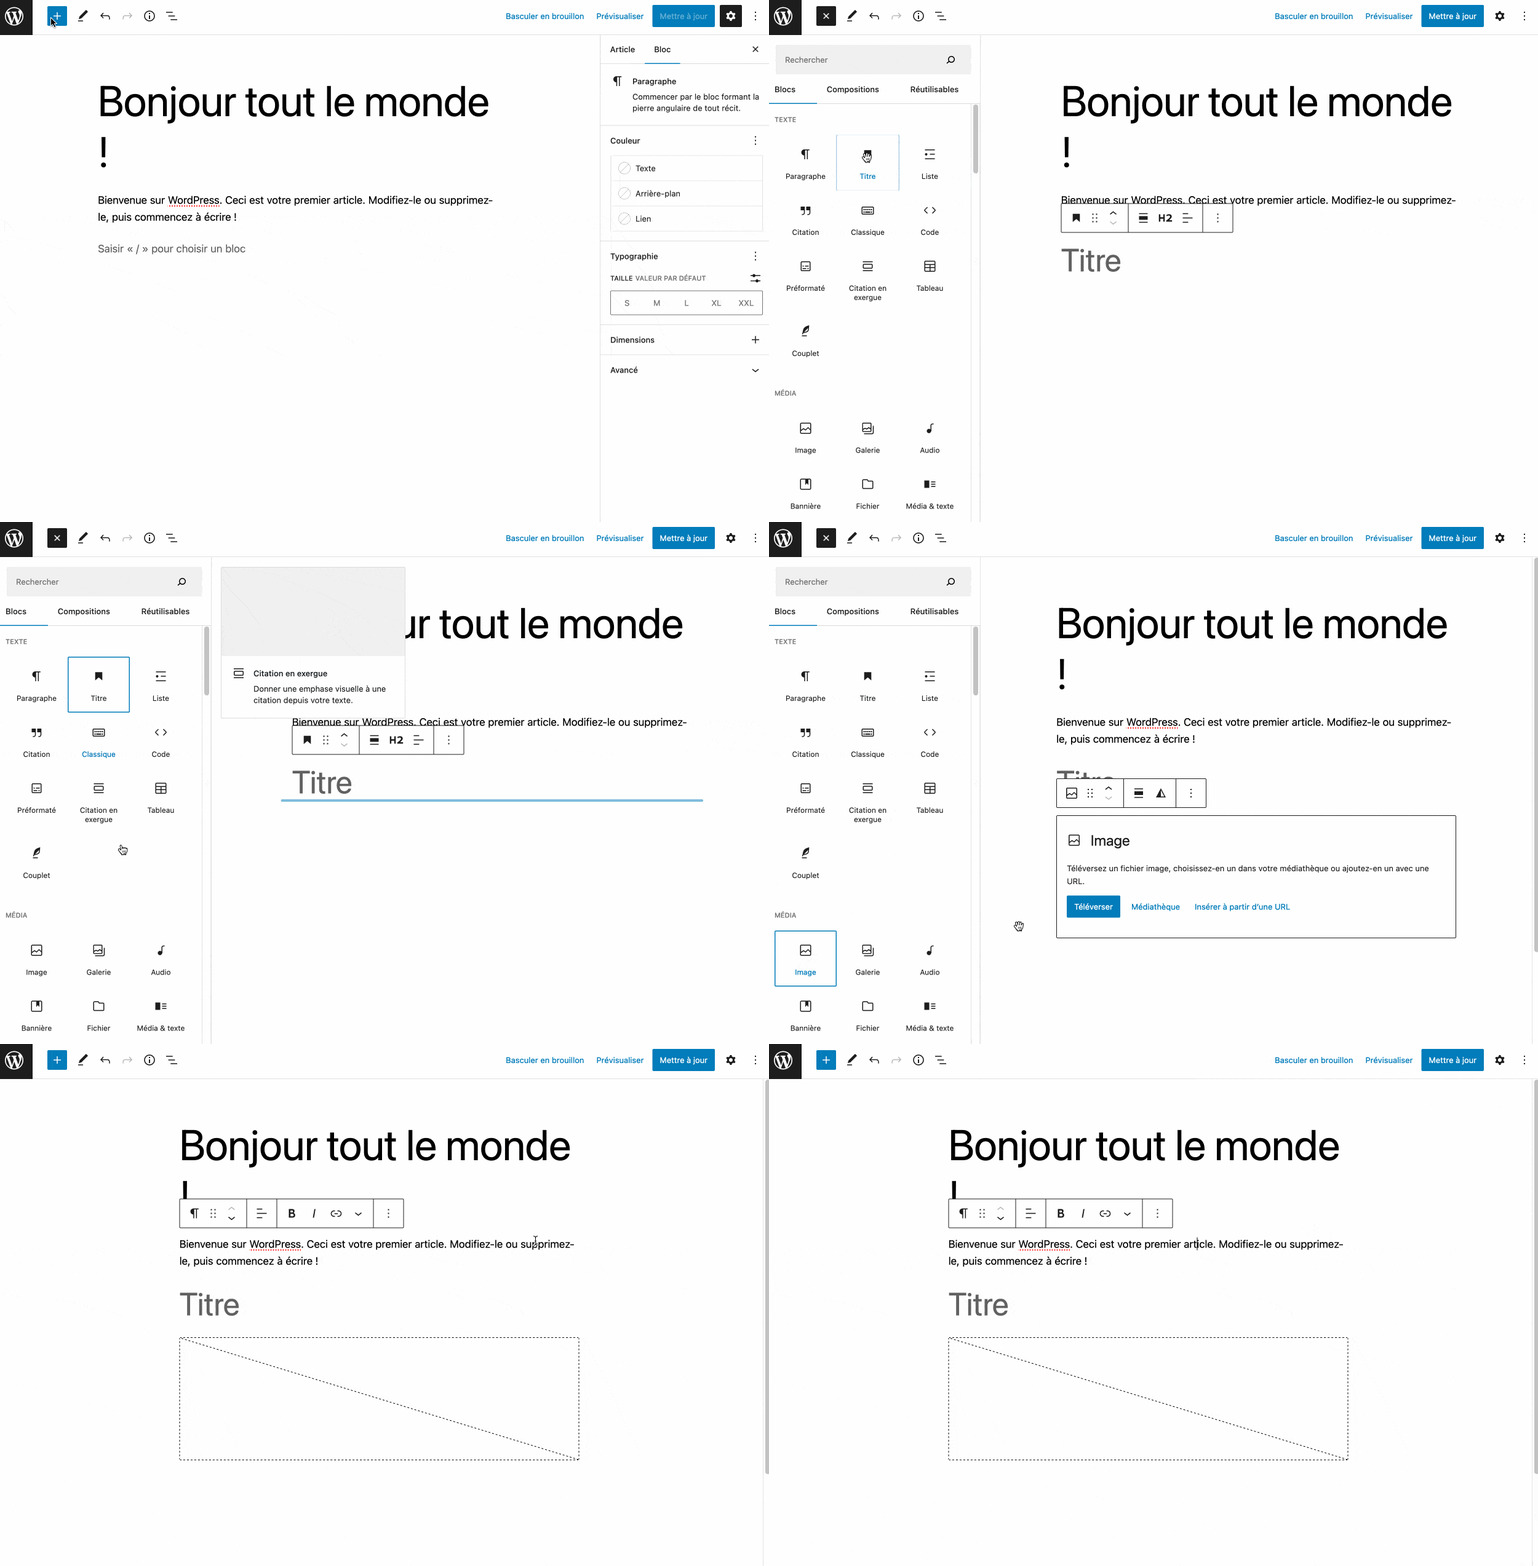
To add a block to your post, click the blue “+” icon at the top of the page. This action opens a menu in the form of a sidebar presenting 6 families of content elements (blocks):
- Text, with (among others) the Paragraph, Heading, Quote, List blocks, etc.
- Media offers the Image, Gallery, Audio, Video blocks, etc.
- Design lists blocks that allow you to insert buttons, columns, a separator, etc.
- Widgets displays WordPress’s old default widgets, which have become blocks (remember).
- Theme brings together blocks for adding a logo, a navigation menu, a list of your posts, a login form for your website, etc. Here, the selection of blocks will be more or less extensive depending on the theme you use.
- Embedded Content. Here, you will find blocks for adding content (via a simple embed link) from platforms such as YouTube, Twitter, or Spotify.
In total, WordPress offers nearly a hundred blocks natively. To add one to the body of your page, you can either:
- drag and drop it (drag and drop) to the location of your choice;
- click on it. In this case, it will be added automatically below the last block (section) you just included.
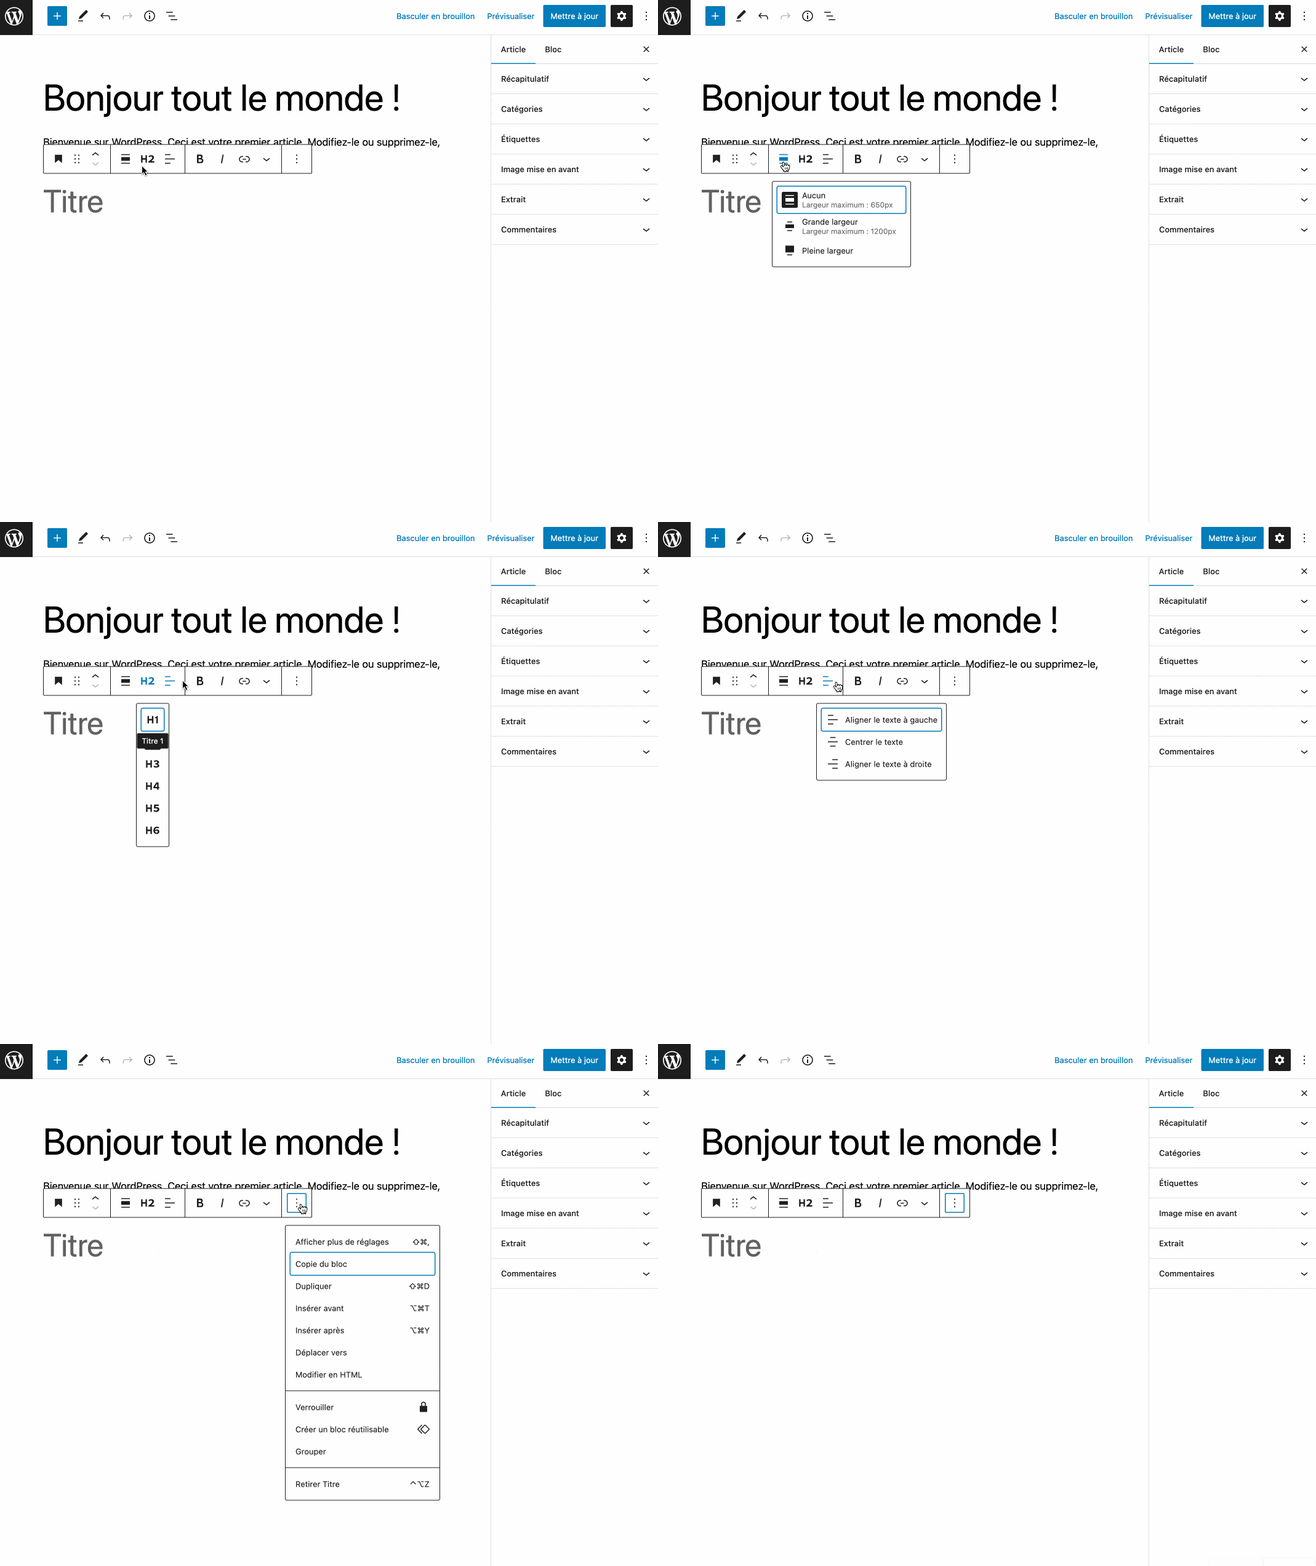
Once you have added content inside your block, a toolbar lets you make some initial changes if needed.
For example, for this Heading block, you can:
- change its alignment and width;
- change its heading level (hn tags: h2, h3, h4, etc.);
- add bold or italics to it;
- insert a hyperlink;
- access more advanced settings to copy, duplicate, group, or even lock the block in question.
This introduction is interesting, but you can go much further in customizing the visual appearance of a block, rest assured.
How do you customize a block’s style?
As soon as you add a block, settings specific to that block become available in the right-hand sidebar of the WordPress Gutenberg editor.
The number and type of settings vary depending on the block you add.
For example, the Heading block mainly offers settings for typography (size, weight) and text color.
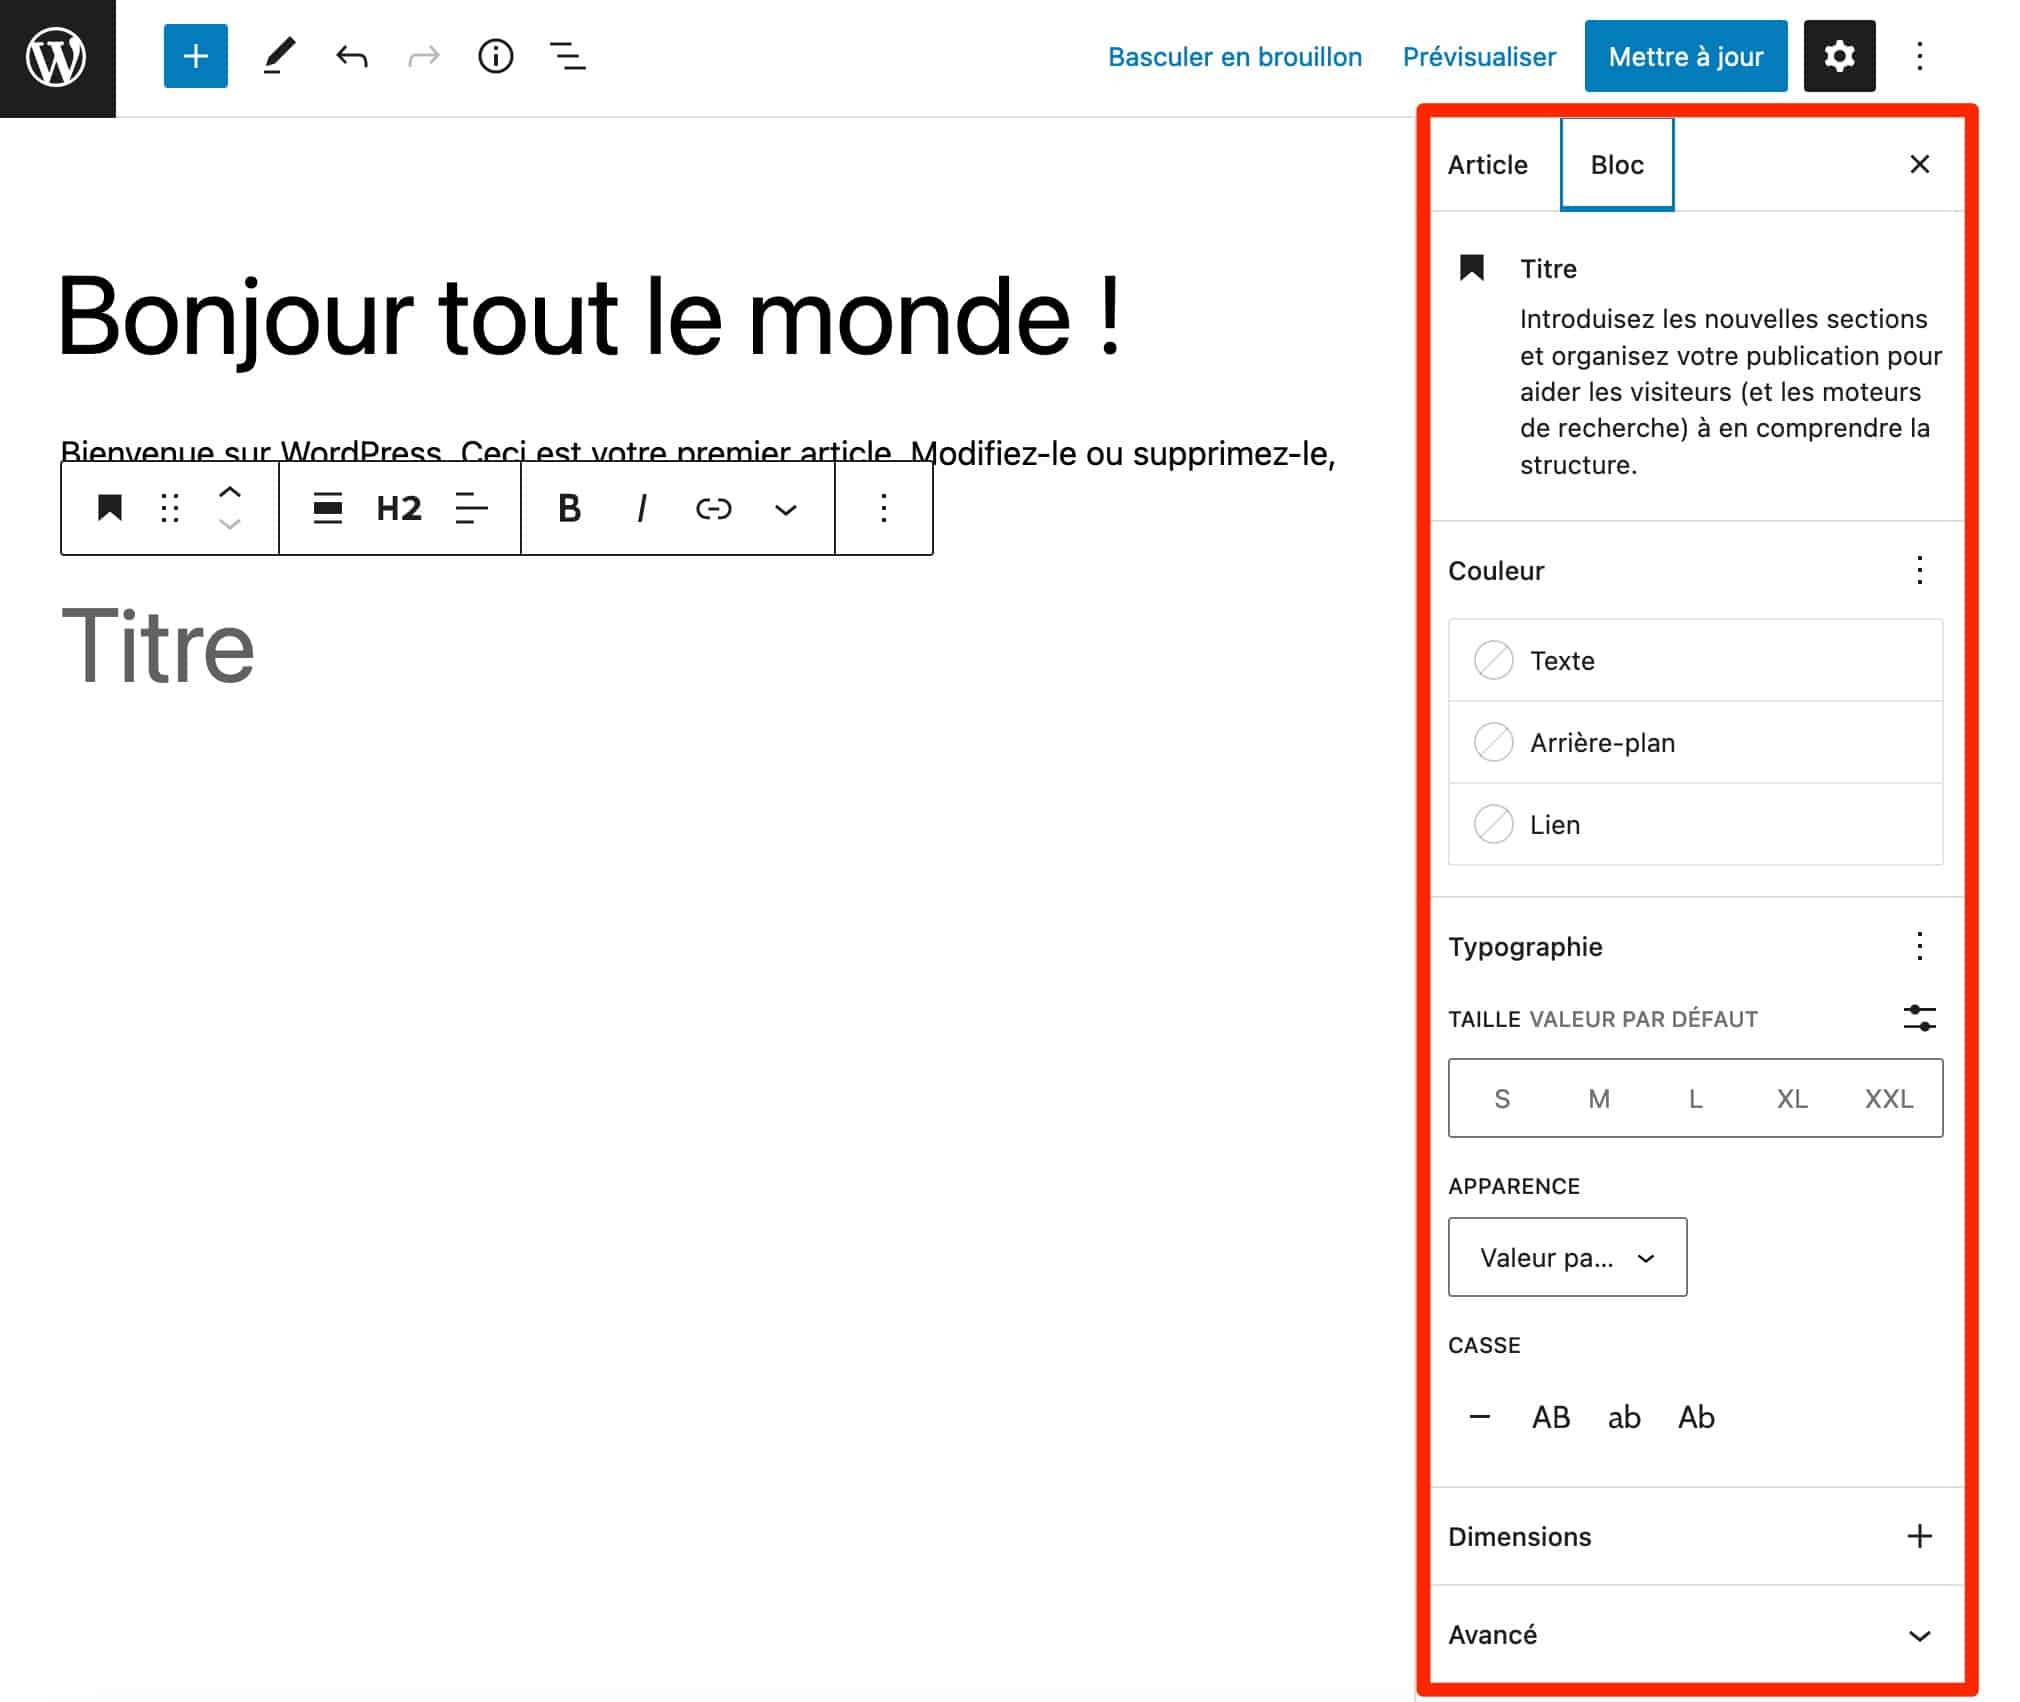
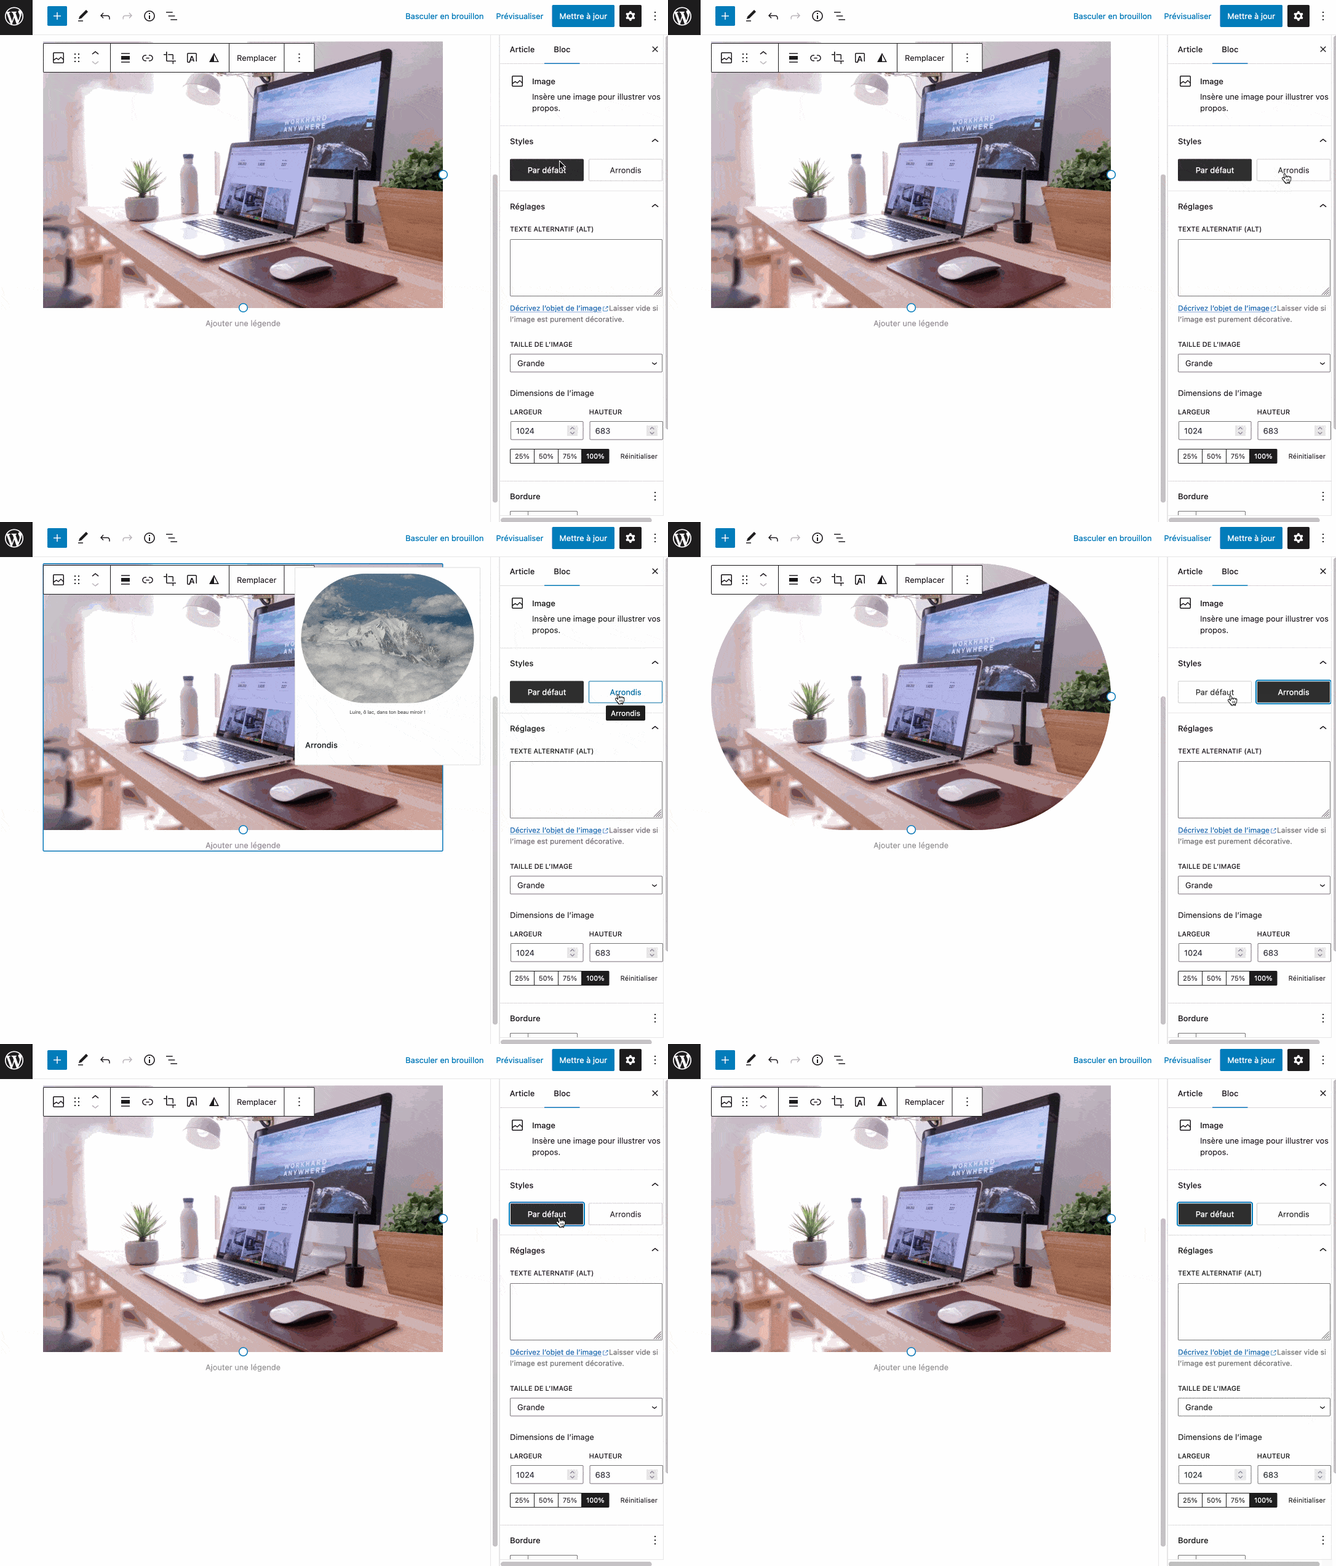
Now, look, it’s very different with the Image block. Here, there are no typography-related settings (which makes sense). Instead, the editor lets you adjust:
- the image style (rounded or default);
- the image border.
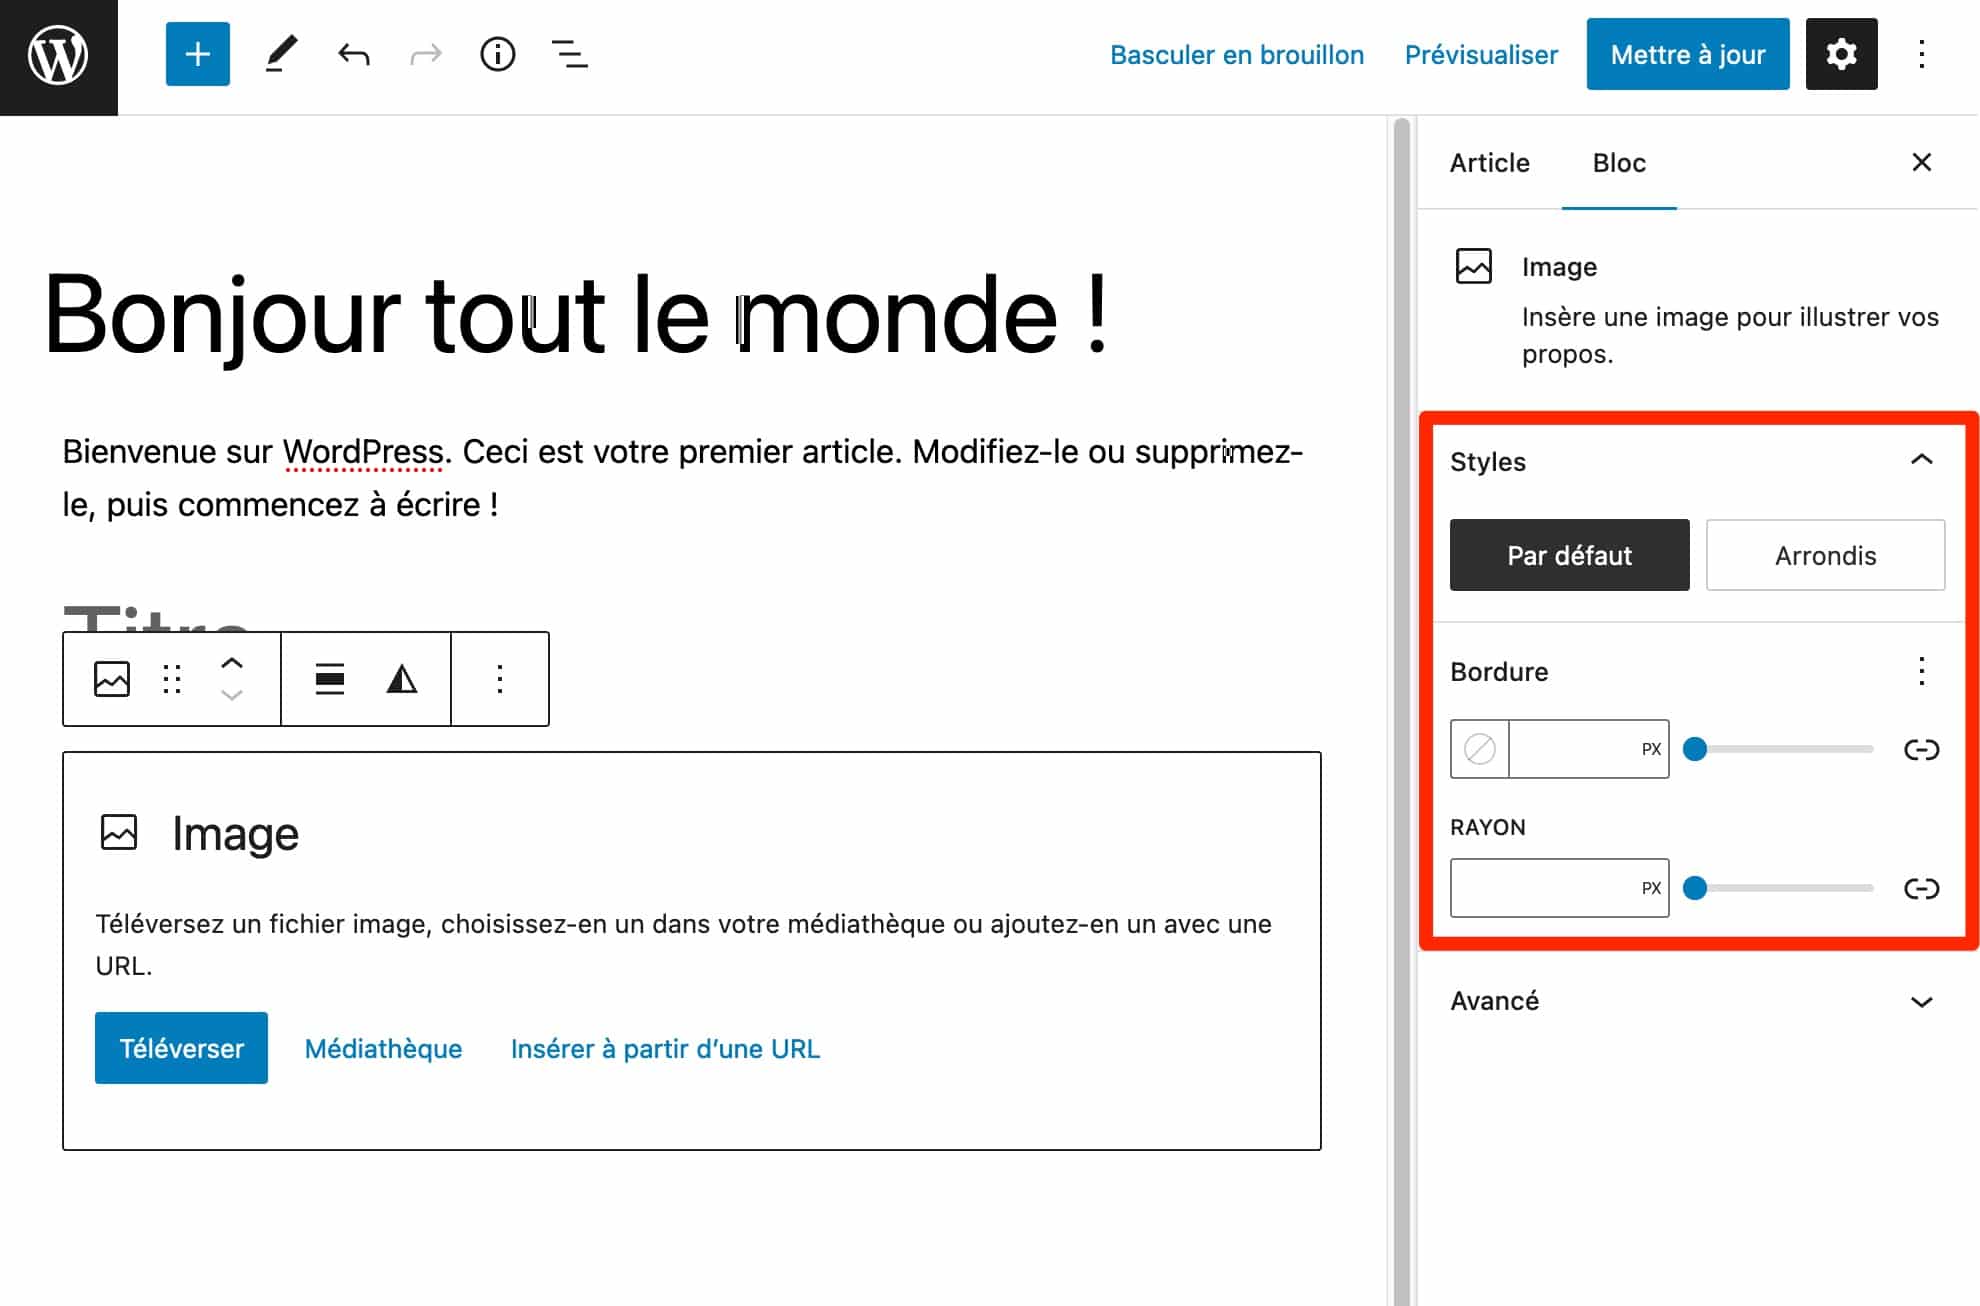
Want to change the style of your image? Simply click the setting provided for this purpose, choose the option you want for your image, and see the result immediately:
How do you use block patterns?
So far, we have talked about individual blocks. But the WordPress Gutenberg editor still has more up its sleeve and has more surprises in store for its users.
If you don’t want to start from scratch, you can also insert what are known as block patterns (block patterns, in English).
To put it simply, this is a ready-to-use template containing several blocks. The number available varies depending on the theme you are using.
To get an overview of what you have available, click the “+” button, the same one you already used to add a block (section).
You will see a “Patterns” tab. A drop-down menu lets you filter patterns by category to make your search easier:

In the example below, we are going to add the “Pricing table” pattern. If we break it down, we can see that it includes several blocks, laid out over 3 columns:
- A Column block, then;
- A Heading block;
- A Paragraph block;
- A Separator block;
- A List item block;
- A Button block.
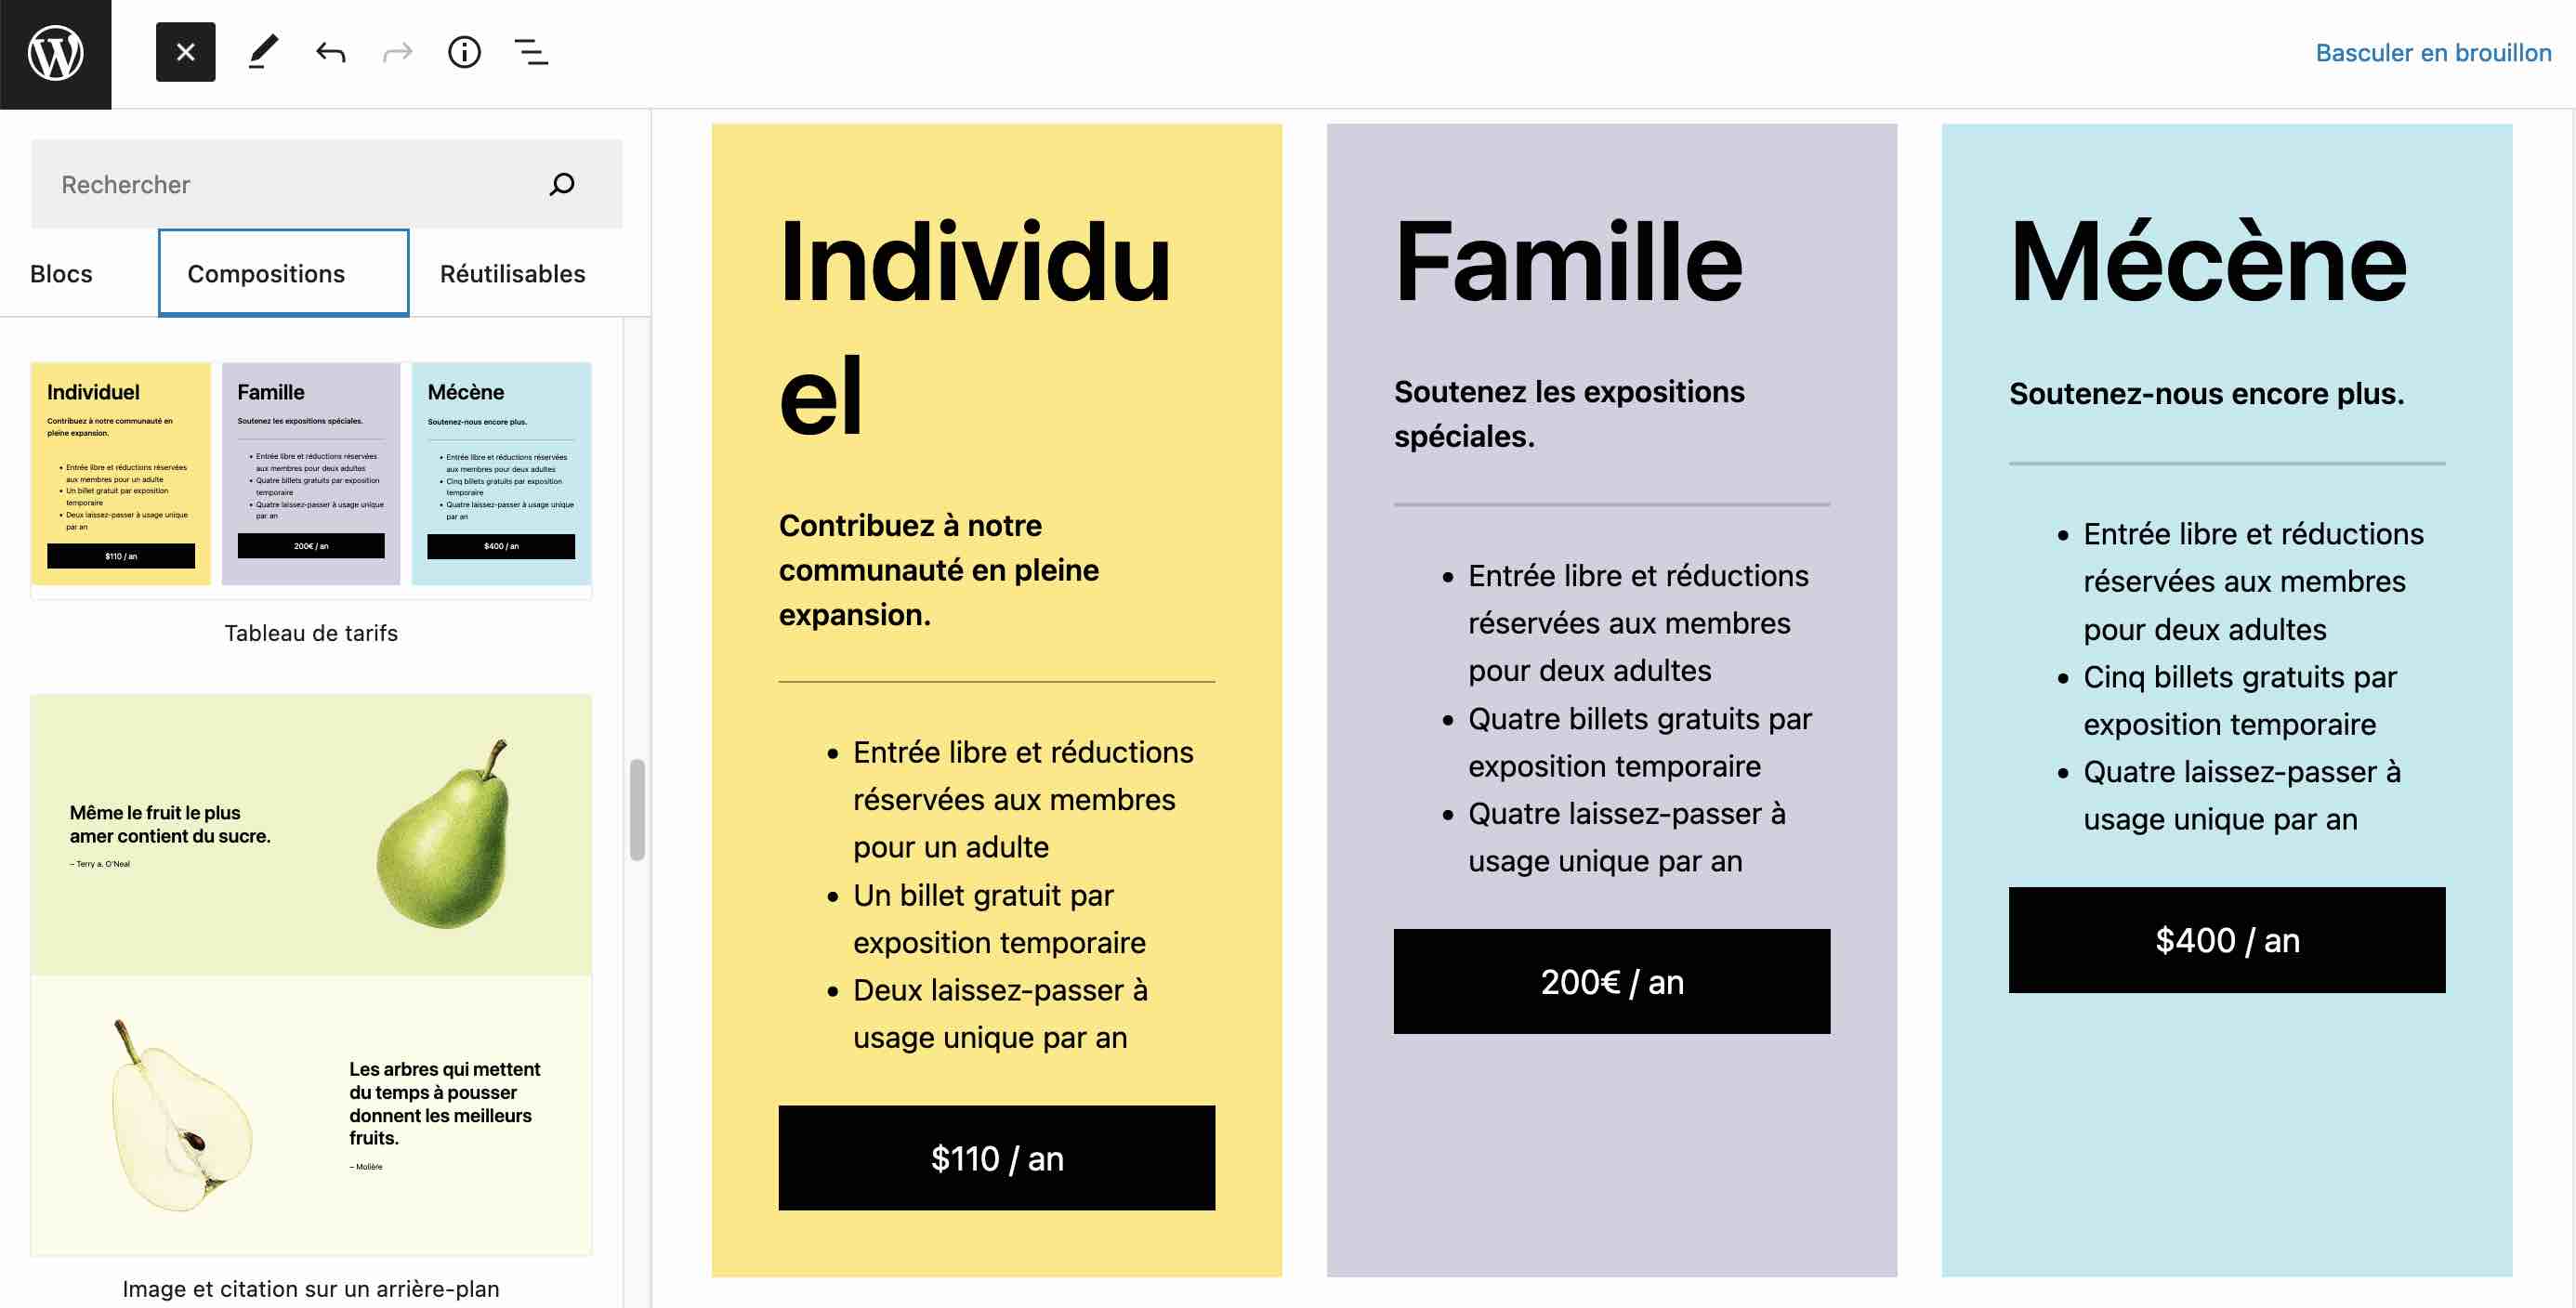
This can save you valuable time if you were planning to add a pricing plan. Of course, the template can be customized however you like, without touching the code. You can change everything, from the text to the colors. And nothing prevents you from adding your own blocks to each pattern.
You can access more patterns on the official directory provided by WordPress. Developers from around the world publish their block patterns there, which you can either download or copy and paste directly into your content.
How do you use reusable blocks?
While block patterns will help you boost your productivity, the same is true of another key Gutenberg feature: reusable blocks (reusable blocks).
Thanks to this option, you can create a custom block or pattern and reuse it wherever you want on other pages or posts (content types) of your WordPress site.
There are quite a few possible use cases for reusable blocks. For example, it can be very useful for creating calls to action that encourage people to contact you.
Calls to action that you can then place in strategic locations across your site… without having to create them each time.
To set up your template — your reusable block — it’s very simple:
- select the block of your choice from the menu. For example, we’ll choose the Button block. But you can also use the Image block, the Heading mode, etc. In short, whichever one you want;
- apply the style and content settings of your choice to it;
- click the three small dots in the editing toolbar, then on “Create a reusable block”;
- finish by giving your reusable block a name.
It is now available in the block inserter, in the “Reusable” tab:
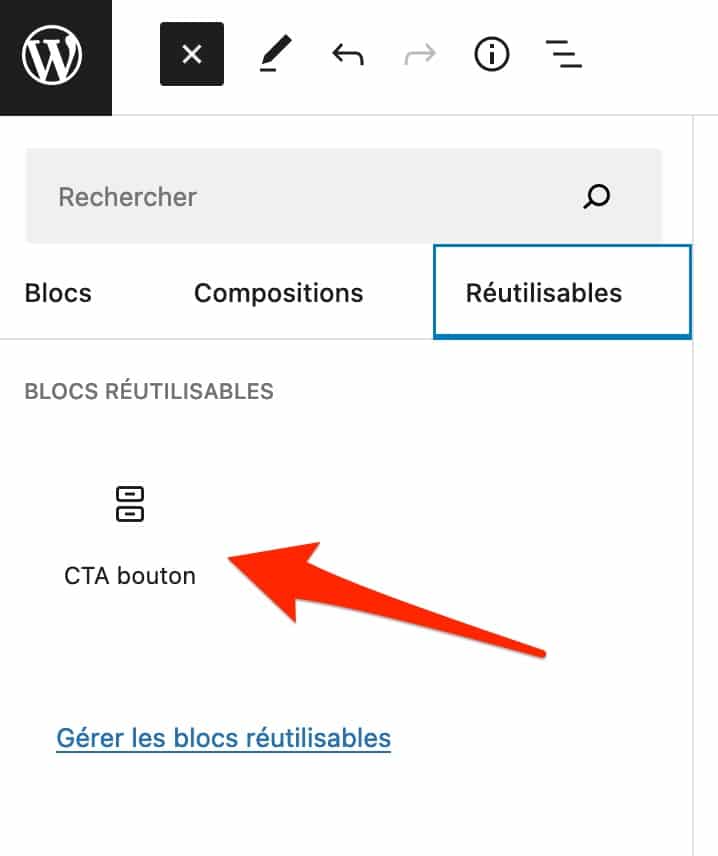
To go further with reusable blocks and take advantage of an admin interface with more options for configuring them, use the Reusable Blocks Extended plugin.
How do you use the WordPress Site Editor?
Until now, most of our overview has focused on using the WordPress Gutenberg editor for your content types (posts and pages).
If you use a block-based theme, you can also take advantage of Gutenberg to edit every part of your site. To do this, go to Appearance > Editor.
You will arrive on your site/blog homepage. The editor works the same way as it does for your posts and pages.
You can add blocks and patterns via the inserter tool, then modify them in the right-hand sidebar.
But there are still a few specific features:
- in Site Editor mode, you can edit your header and footer by clicking on the relevant area;
- you can add prebuilt page templates (blog, 404, archives, etc.). To do this, click the icon representing the WordPress logo in the top left;
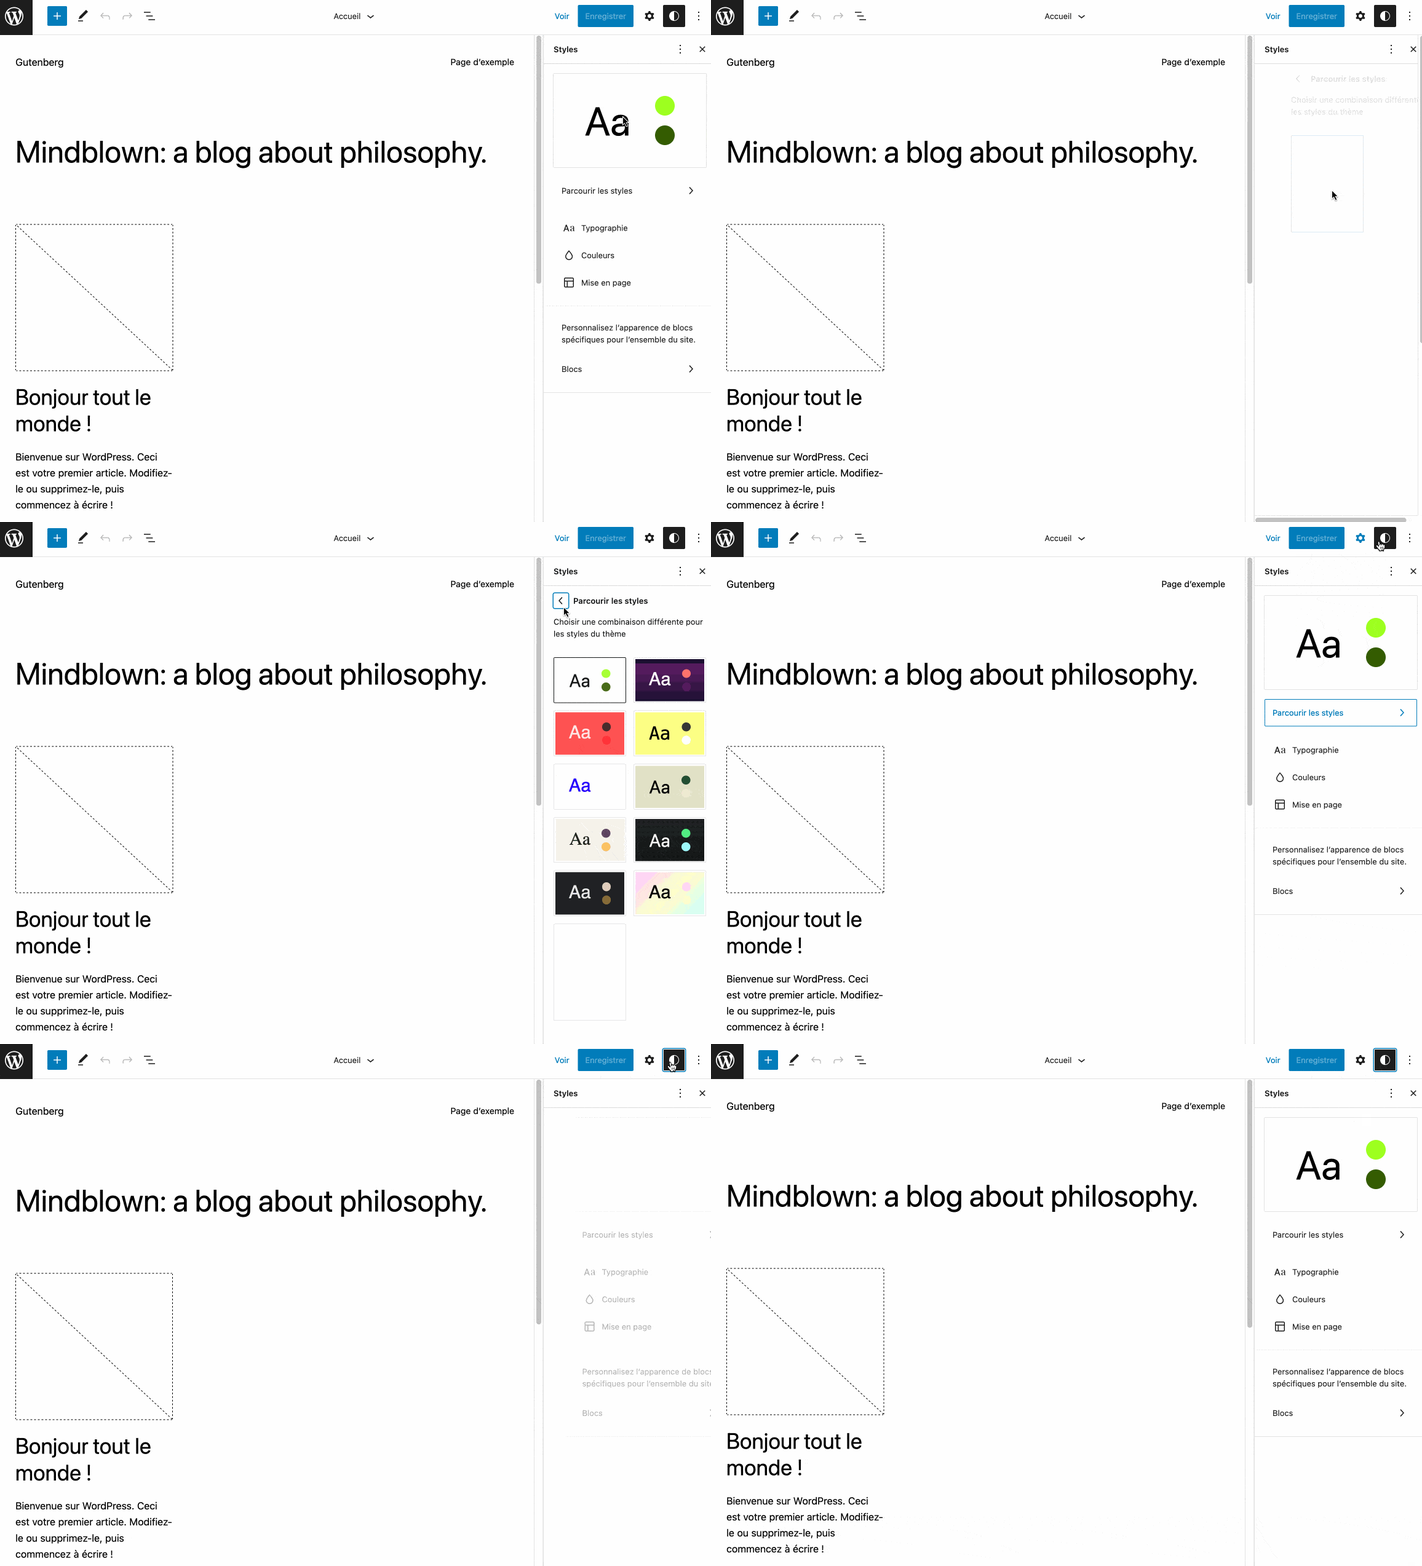
- thanks to the Global Styles editing interface (Global Styles), you can change the overall style of your entire site (colors, typography, layout), without having to modify each block one by one. You can even apply a style to each block of your choice, so that it is reflected across all blocks of the same type on your site.
How do you disable Gutenberg?
At this stage, Gutenberg should be much more familiar to you. It may also be getting on your nerves so much that you miss the old TinyMCE editor.
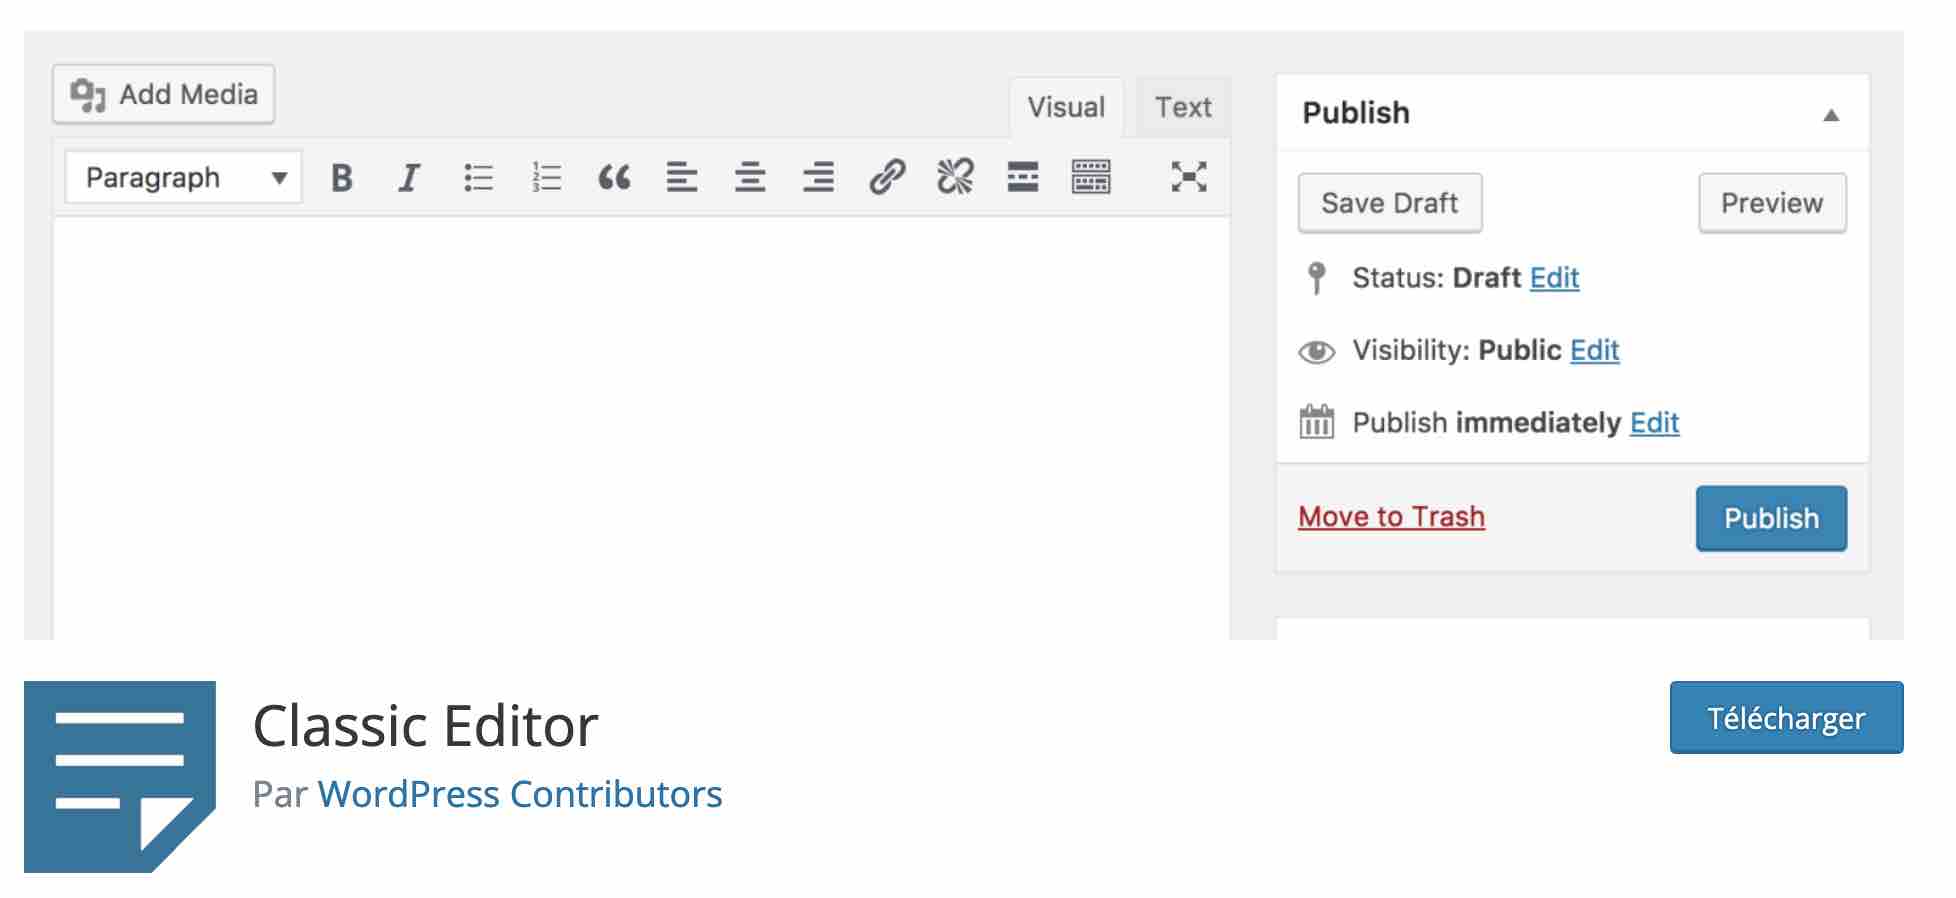
If you are using WordPress 5.0 (or a later version), you should know that it is possible to disable Gutenberg by activating the Classic Editor plugin.
Maintained by the team responsible for WordPress development, this plugin “restores the previous classic WordPress editor and its editing screen”, according to its description in the official plugin directory.
However, the Classic Editor plugin may not be immortal. For now, its maintenance is planned until 2024 at most, or perhaps a little longer “if necessary”.
10 plugins to extend the capabilities of the WordPress editor
With Gutenberg, the field of possibilities opens up considerably. With it, you have discovered that it is possible to create entire WordPress sites from scratch.
Because it is malleable and extensible by nature, many developers in the WordPress ecosystem are taking advantage of the opportunity to offer their own plugins, capable of extending and improving its capabilities.
As a result, there are dozens and dozens of plugins that offer their own catalog of blocks for the text editor.
But also, for some of them, templates and other block patterns.
Most of the time, with this kind of plugin, you benefit from additional design and layout options, compared to what WordPress offers natively.
These plugins also offer blocks that you do not get by default in WordPress. Your creative and layout possibilities are therefore greater, without you having to touch any code.
Here are some Gutenberg block plugins that are among the most downloaded in the official plugin directory:
Alongside these, there are also less “catch-all” plugins (without the pejorative connotation) whose purpose is to provide a single block to perform a specific task.
For example, the Map Block for Google Maps plugin lets you add a Google Map to your content using a Gutenberg block.
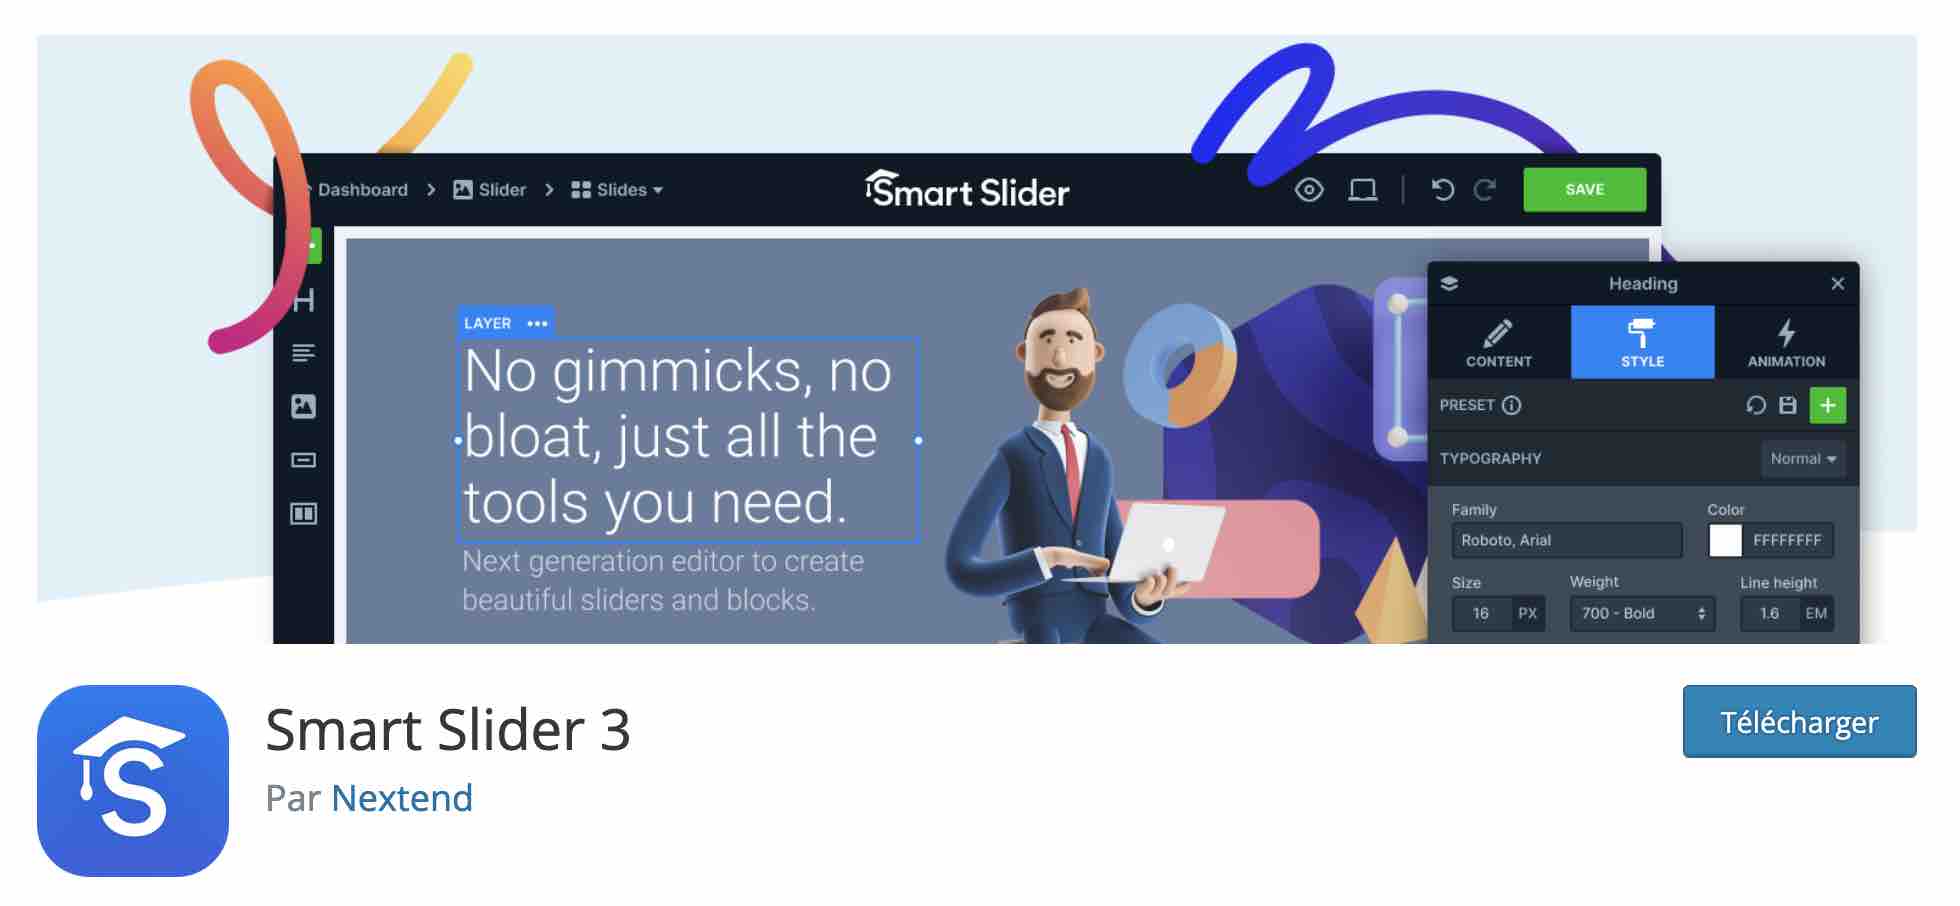
Same principle for the Smart Slider 3 plugin, which adds a slider to your pages and posts.
You know how Gutenberg works on WordPress. And you even have a nice selection of plugins to use to take advantage of additional features!
To finish, discover a few practical tips to be more productive with the WordPress text editor.
6 tips for working more efficiently with Gutenberg on WordPress
Use keyboard shortcuts
Are you a fan of Ctrl + Z (for PC users), or Cmd + Z (for Mac fans)? Well, good news: it also works in Gutenberg!
Did you go a little too fast when adding a block, content, a layout, or something else? Go back immediately with a simple Ctrl + Z or Cmd + Z.
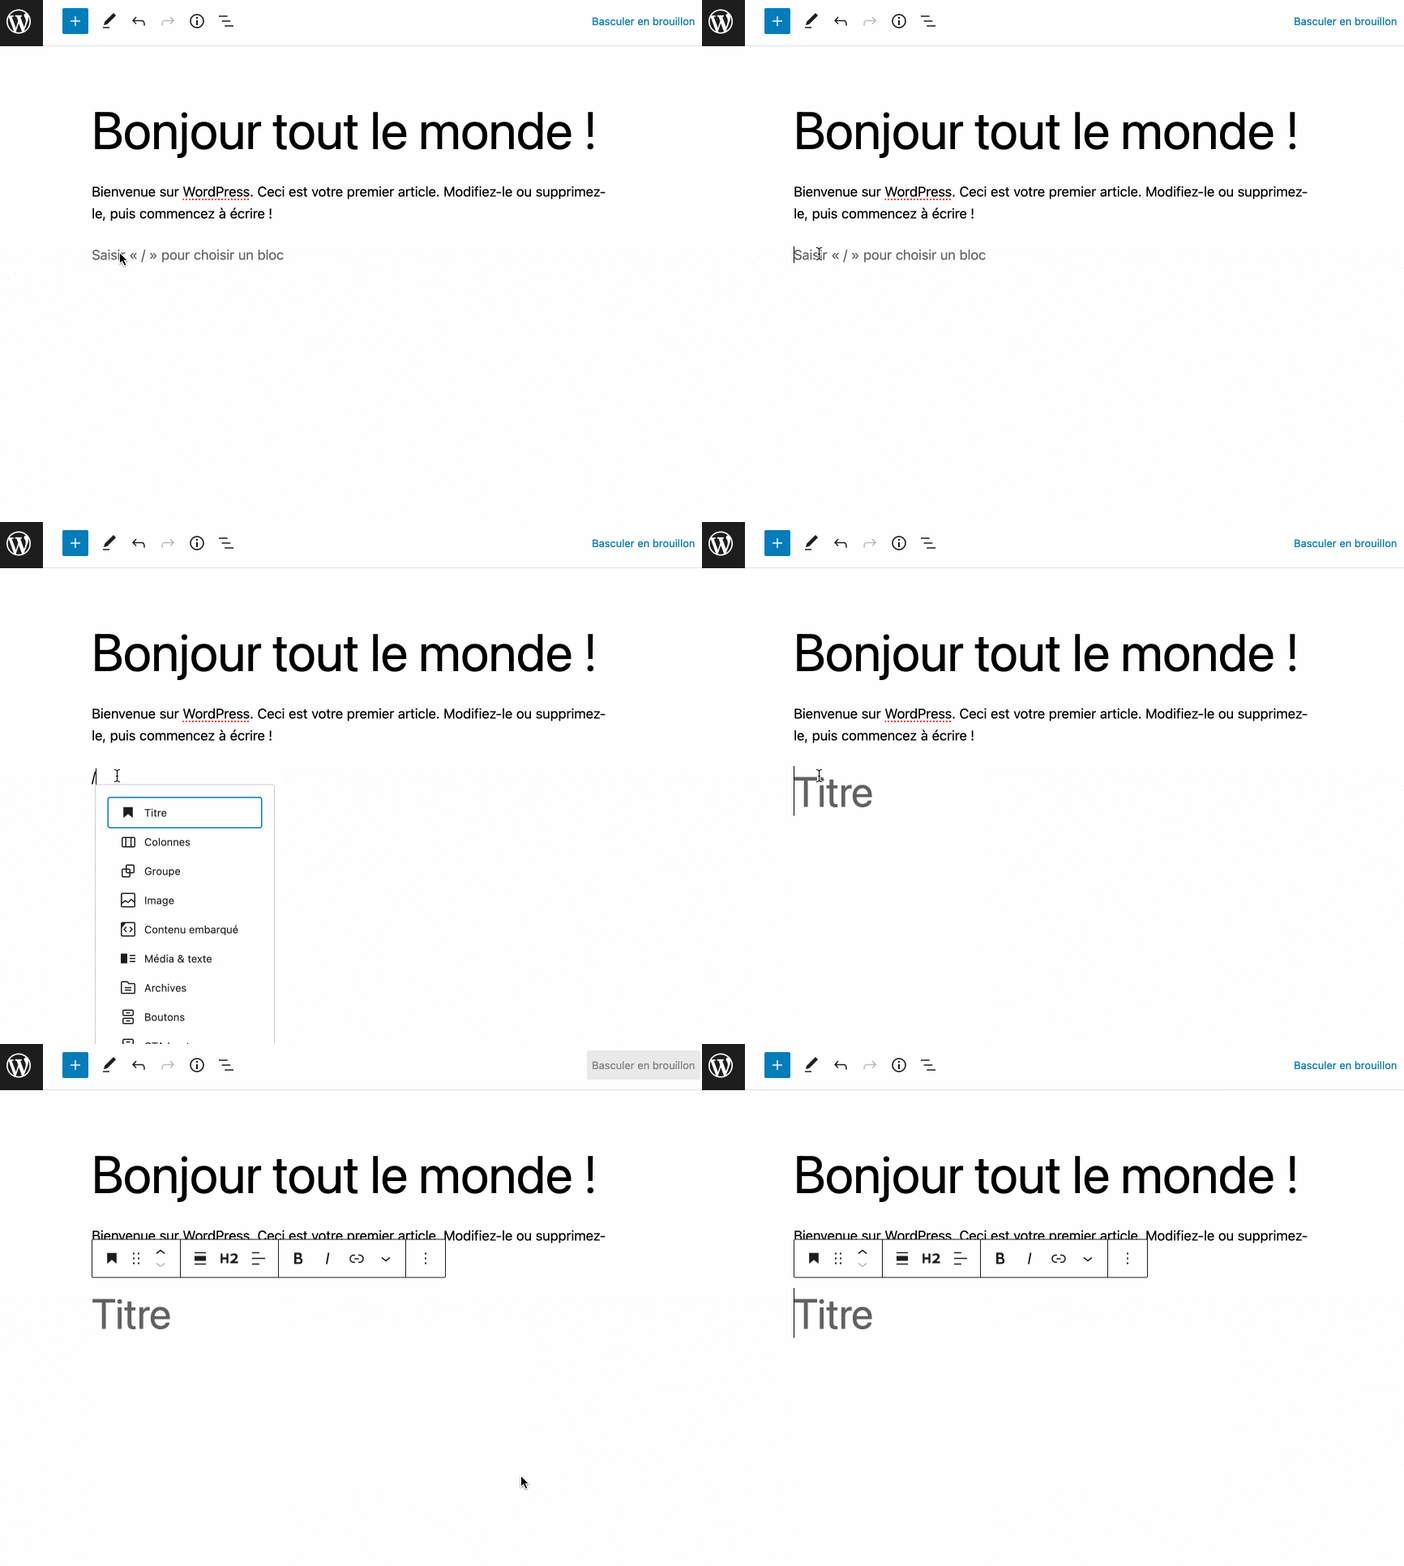
Another very practical tip when it comes to keyboard shortcuts: you can insert a block by adding a slash (/), without having to use the inserter tool:
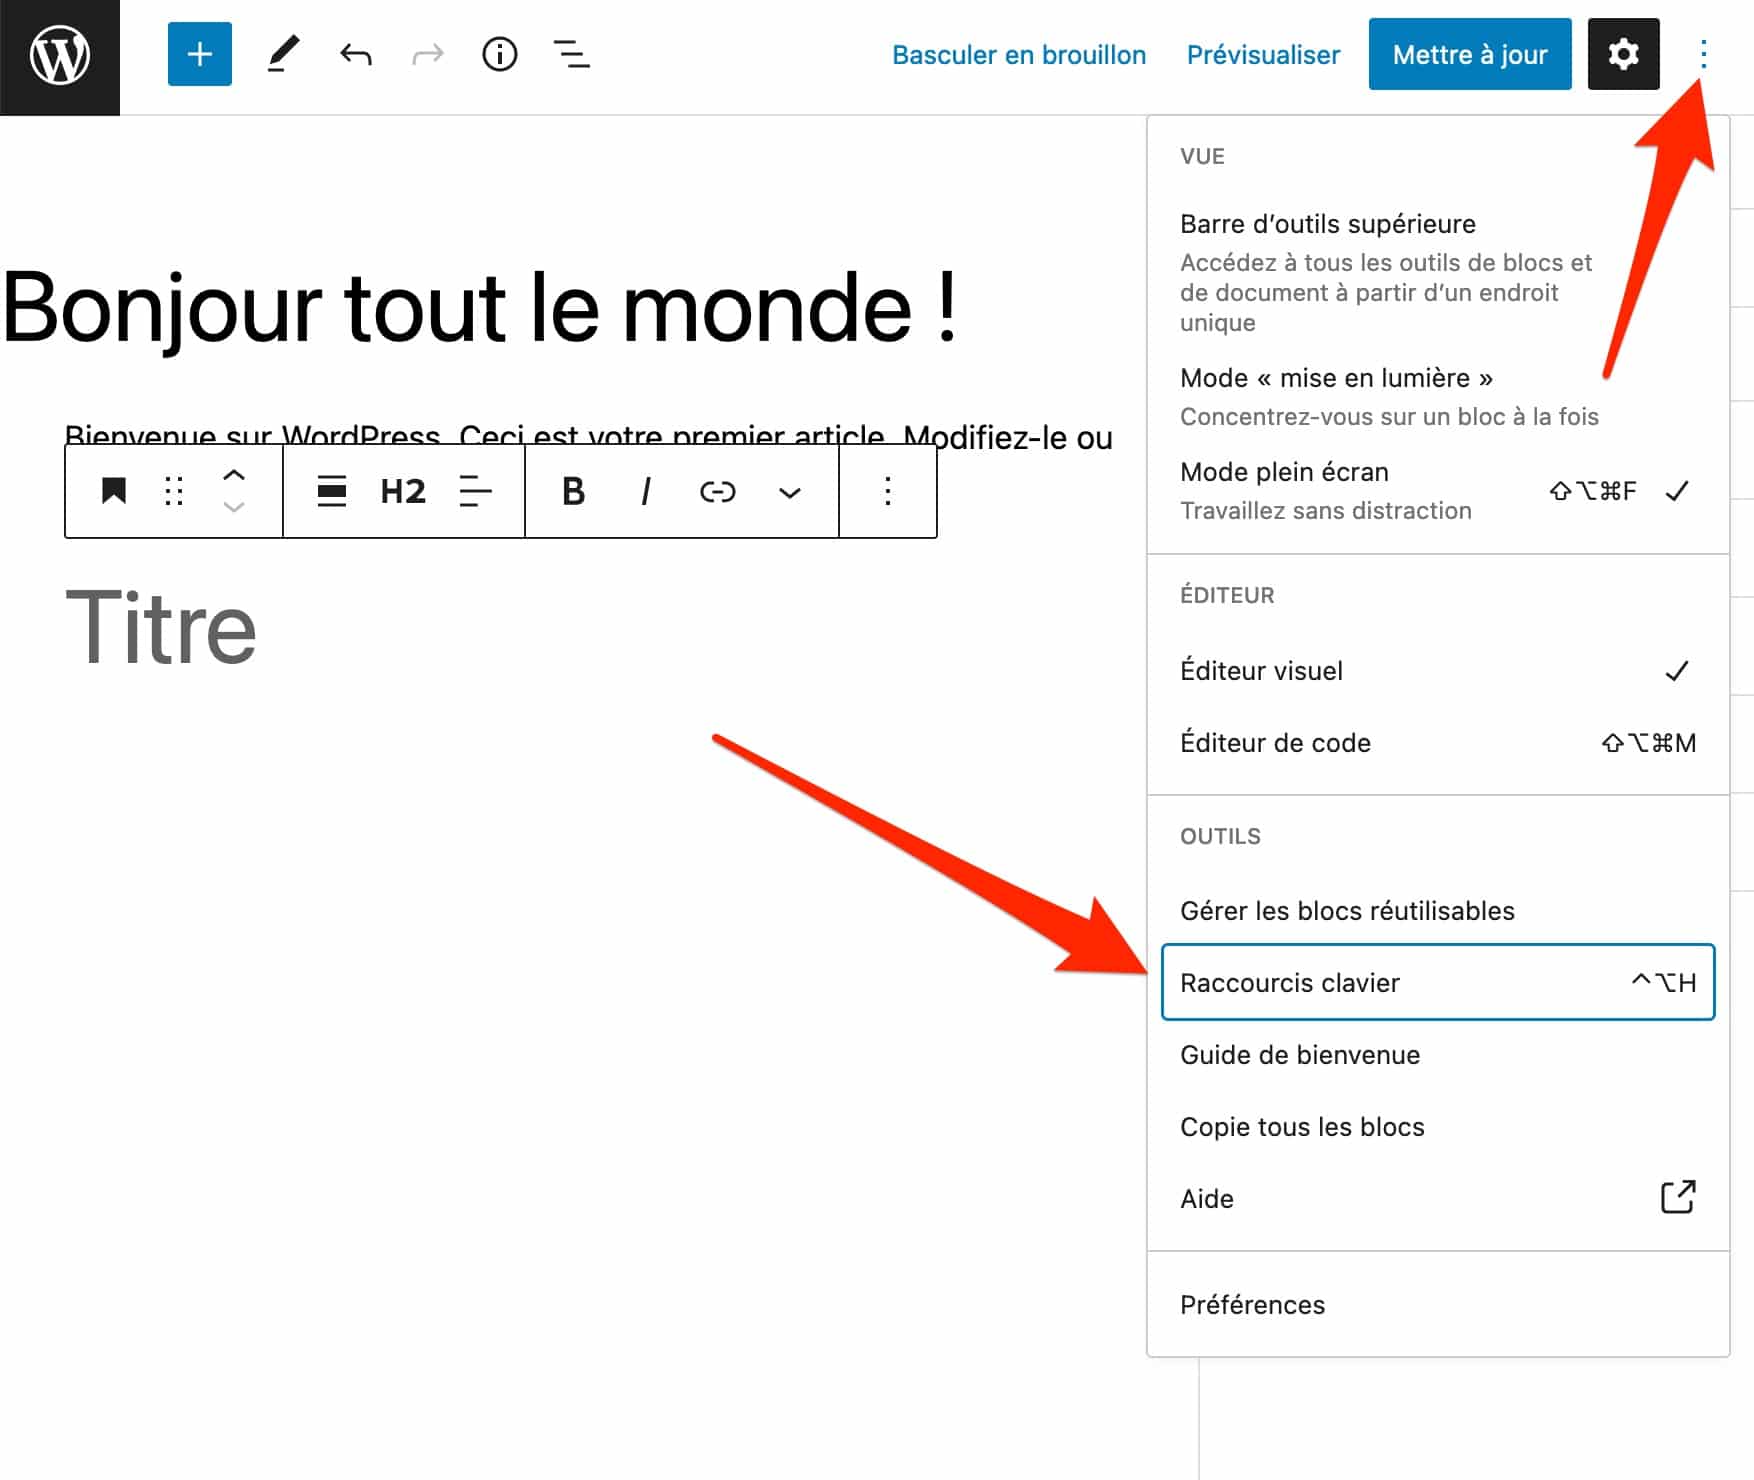
Finally, you can access a list of keyboard shortcuts offered by the text editor by clicking on the 3 small dots at the top right of the editor.
Take advantage of the options in WordPress editor’s “View” mode
If you are used to writing content, you know that concentration is very important in order to be productive and efficient.
Working without distractions can be a real plus, and that is what Gutenberg offers through the options in its “View” mode.
To access it, click on the 3 small dots at the top right of your editing window (you know where by now). You can then enable the following modes:
- Full-screen mode. In this case, you will no longer see the WordPress admin menus and will focus on your layout;
- Spotlight mode, which highlights only the block you are currently working on;
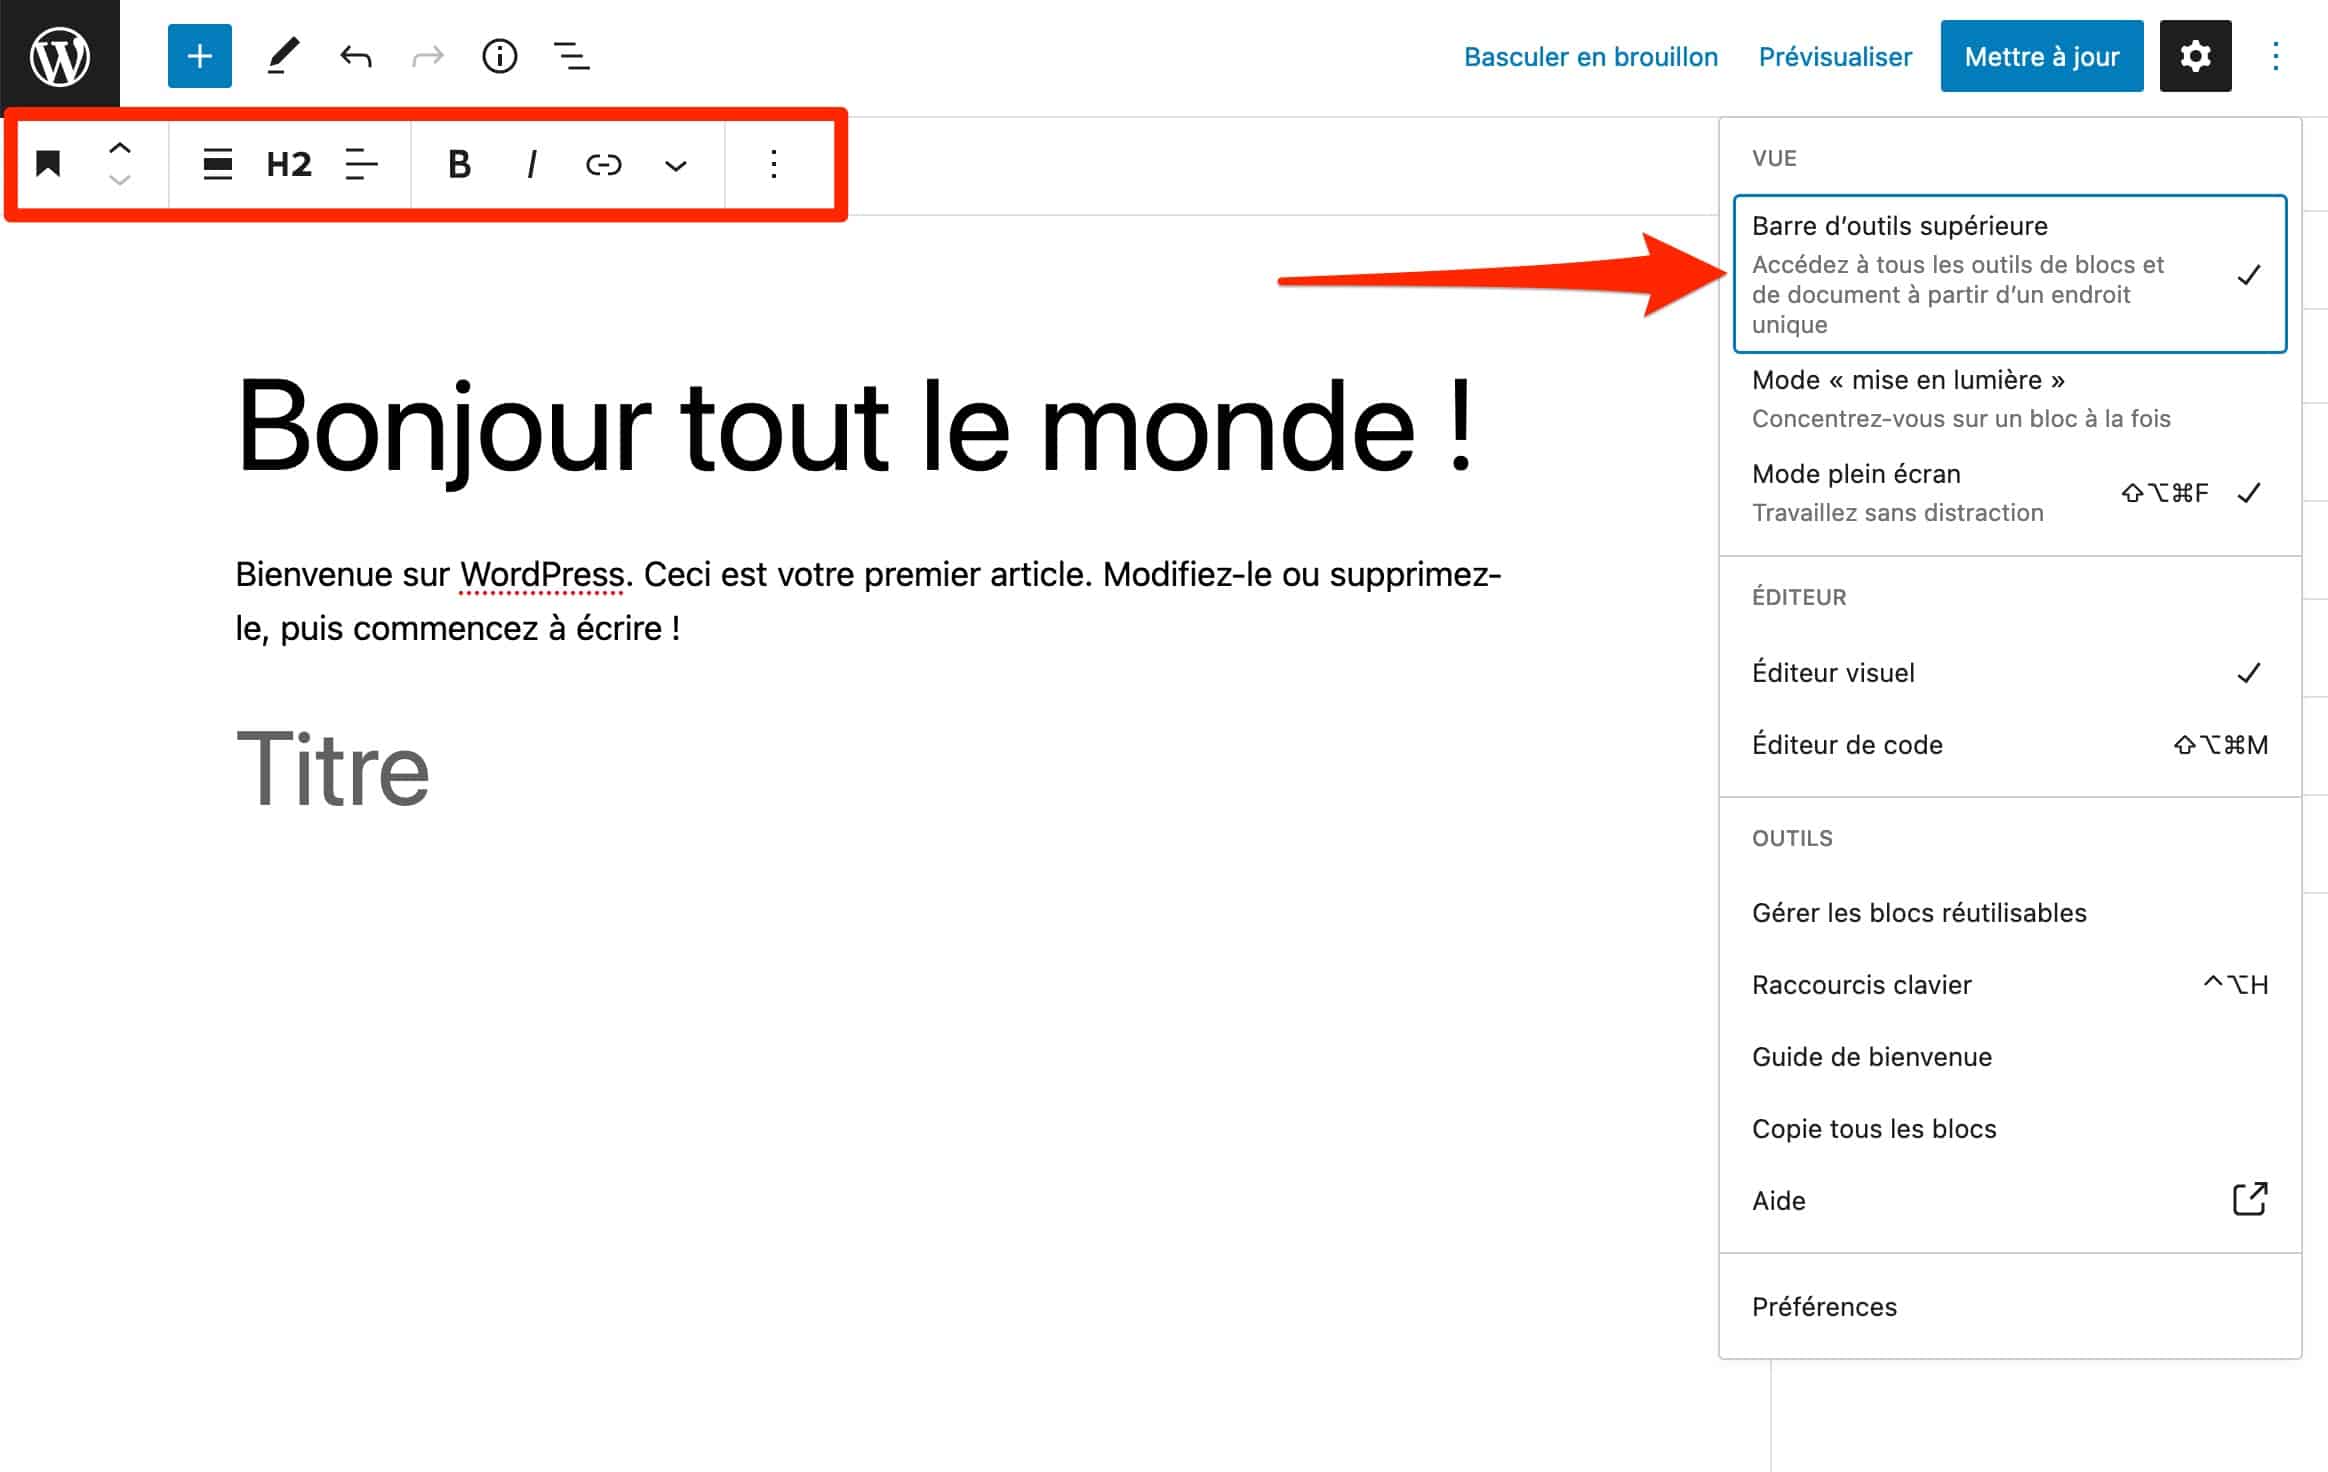
- Top toolbar mode. In this case, the toolbar and all its options will be displayed at the top of the screen at all times.
Create columns in one click with Gutenberg on WordPress
With Gutenberg, blocks are stacked one below the other by default. Of course, you can reorganize them however you like by moving them up or down in your post or page using drag and drop.
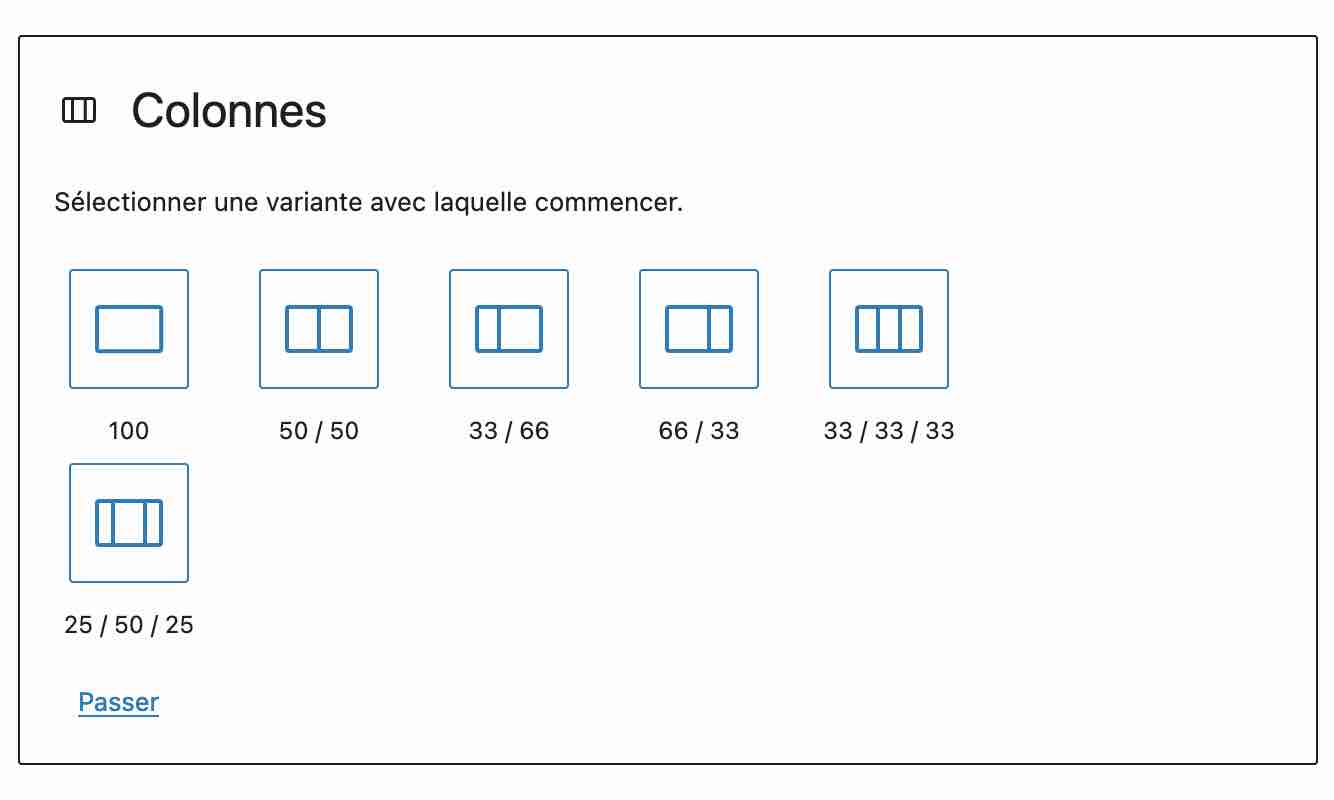
For more advanced layouts, it is possible to group several blocks on the same “line” by presenting them as columns.
For this, there is a dedicated block, simply called Column. Once you have added it, you can choose from 6 types of columns, then add the block(s) of your choice to each column:
Add your images by dragging and dropping them from your computer
To enhance your columns, you may need an image. If it is on your computer’s desktop, you can insert it into your content with a simple drag-and-drop action (without having to add an Image block).
Thanks to this, you no longer need to upload the image in question to your Media Library.
However, don’t forget beforehand to give your image an explicit title, then fill in its attribute once you have added it in Gutenberg. This is important for optimizing the SEO of your WordPress site.
Easily add link anchors
While Gutenberg has an HTML code editor—rather uninviting, let’s be honest—to allow you to modify your content types (posts, pages, etc.), one of the strengths of the text editor lies in the fact that it can be used without… coding.
With it, adding a link anchor becomes child’s play, without having to handle any HTML.
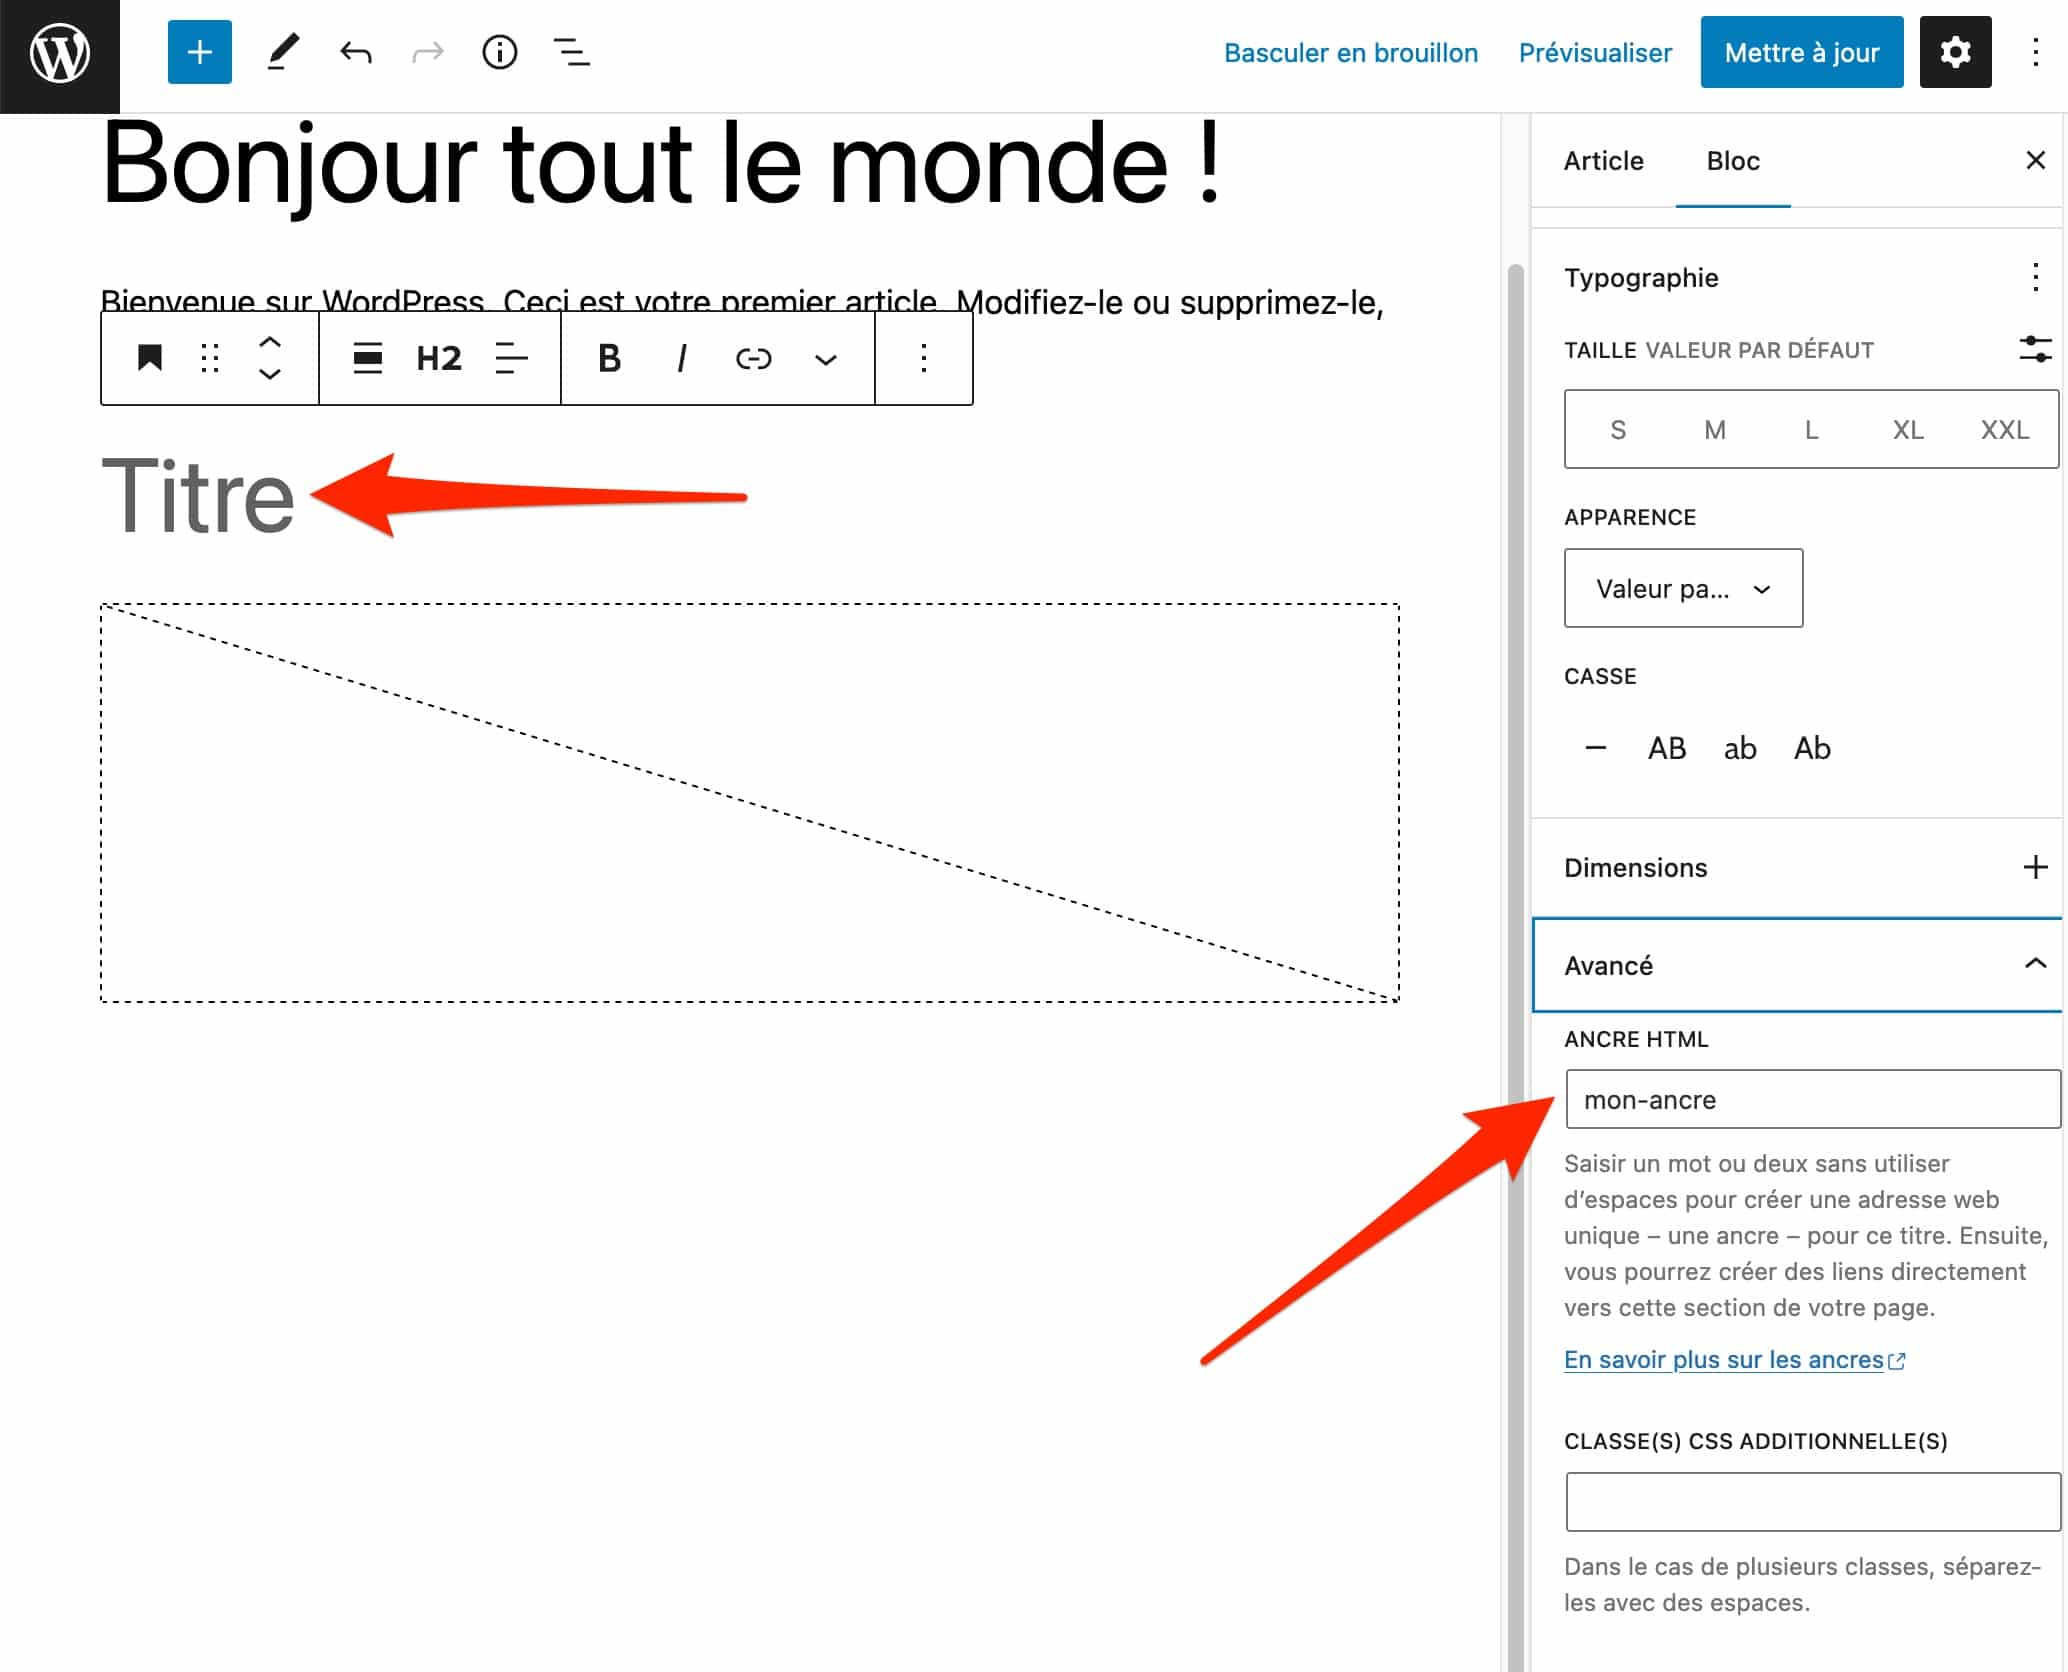
To do this, follow this short Gutenberg tutorial dedicated to WordPress. First, create an anchor on the heading of your choice.
Select it, then give it the name of your choice (e.g.: my-anchor) in the “Advanced” section of the Heading block:
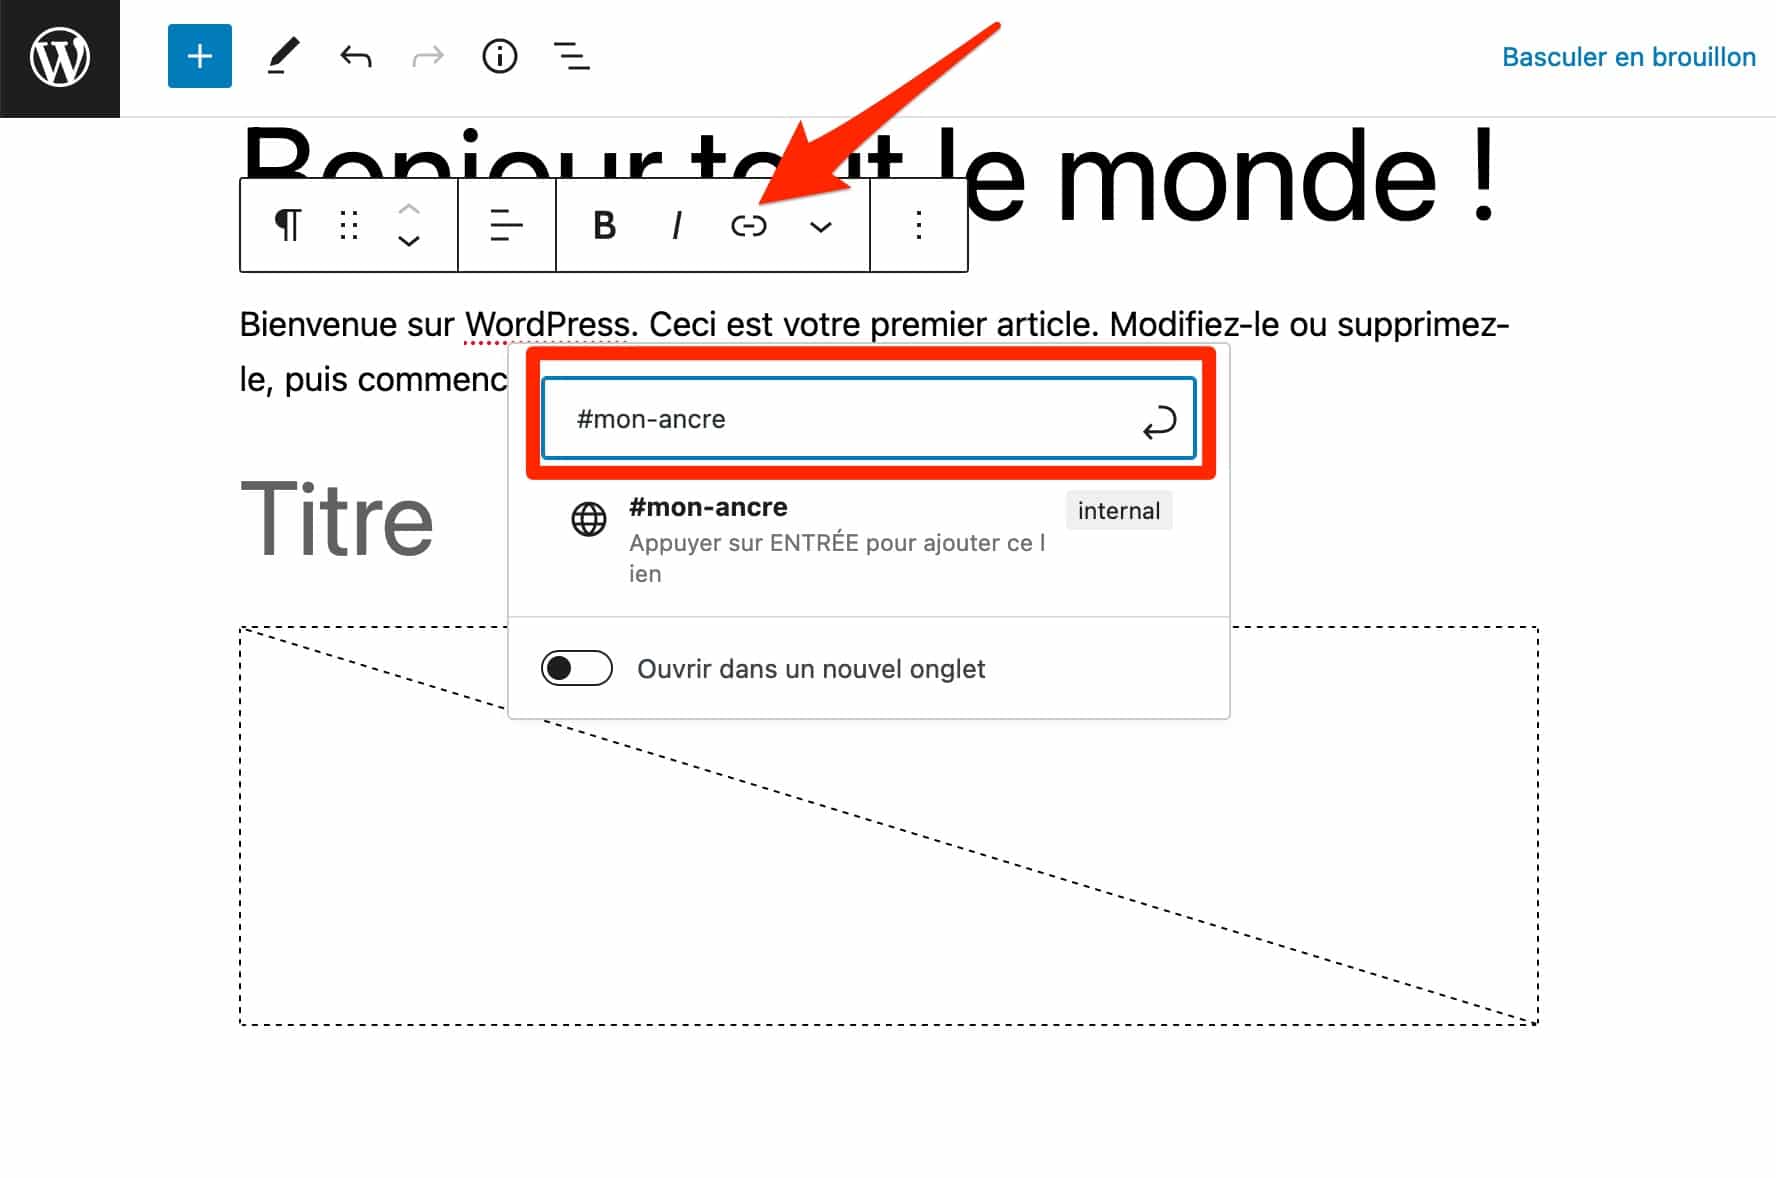
Finish by creating an anchor link on the text of your choice. This link will redirect to the heading on which you added the previous anchor.
Proceed by selecting the text of your choice, then add a link containing the name of your anchor, preceded by the # sign (e.g.: #my-anchor):
Add links by copying and pasting
Finally, note that Gutenberg makes it easy to add videos, tweets, images, or audio by pasting the link to the source you are interested in. This is known as an embed link.
This works, for example, if you want to add a YouTube video to your content. The WordPress Gutenberg editor will automatically create a block and display a preview of the video, as shown below:
WordPress also offers a list of sites from which you can add embedded links, including, for example, Amazon Kindle, DailyMotion, Spotify, TikTok, Ted, Vimeo, etc.
Summary
WordPress’s Gutenberg text editor is a constantly evolving tool. Launched in 2018 and originally limited only to posts and pages, it has expanded its features over time.
Today, it even makes it possible to design an entire WordPress site thanks to the central concept of blocks, without touching any code (HTML, CSS, JavaScript, etc.).
Throughout this guide dedicated to Gutenberg on WordPress, you have notably discovered:
- how Gutenberg works;
- how to use it, thanks to practice-focused mini-tutorials;
- around ten plugins to extend its features;
- tips to be more productive with this text editor.
Because creating content – or even an entire site – with Gutenberg requires technical skills, the Maintenance WP team can support you with your various projects.
Available 7 days a week, our team can offer you a tailor-made solution that will meet your needs quickly, professionally, and efficiently. Contact us to learn more.